On This Day…
On this page you will find significant events in the military history of Buckinghamshire, commemorated on the date of their original occurrence.
VE Day 8 May, 1945 in Buckinghamshire
Surrounded by Russian forces, Hitler committed suicide in Berlin on 30 April 1945. At 1830 hours (British Double Summer Time) on 4 May German forces in the Netherlands, Northern Germany and Denmark were surrendered to Field Marshal Montgomery at Lūneburg Heath near Hamburg by the representatives of Hitler’s designated successor, Grand Admiral Karl Dӧnitz. All remaining German forces in Western Europe were then surrendered unconditionally to General Eisenhower at Reims at 0241 on Monday 7 May, the surrender coming into effect at 2301 hours (Central European Summer Time) on Tuesday 8 May 1945. The definitive act of surrender was signed in Berlin at midnight on 8 May.
The news of the surrender was broadcast in Britain late on 7 May with the following day designated immediately as a national holiday. The day began with an early thunderstorm in the south of the county and it remained sultry all day.
There were spontaneous street parties in Aylesbury and New Bradwell, for example, on 8 May with a bonfire on Whiteleaf Cross and another together with an impromptu concert held in front of the Foresters Arms in New Bradwell. Church Bells were rung including at Haddenham. Thanksgiving services were held at both the parish church and the Baptist church in Chesham.
Aylesbury celebrated with a gathering and thanksgiving service in the Market Square at 3 p.m. with prominence given to blinded and wounded servicemen and to returned Prisoners of War, many of whom had been flown back from captivity to land at Westcott. The Hazells Printing Works Band played for the service with the Lord Lieutenant, Lord Cottesloe, presiding alongside the Mayor. Churchill’s speech from London was broadcast live to the crowds.
In Buckingham it was reported that vendors did a roaring trade in the morning, selling Victory Hats, Victory Windmills and Victory Flags, especially to children. The Magistrates sat as usual, however, and there was routine grading in the market. In the afternoon a piano was brought out into the square from the White Hart and Bert Robinson also entertained with his accordion. Churchill’s speech was again piped into the square from the White Hart and, with licensed premises able to keep open until 11.00 pm, there was dancing in the square. Flags of the allies were displayed on the Town Hall, the bakery having a window display of allied leaders with the Chandos cinema festooned with flags and more flags along the road to Maids Moreton.
At the experimental munitions establishment at The Firs in Whitchurch, popularly known as ‘Winston Churchill’s Toyshop’, the celebrations got a little out of hand. The director Millis Jefferis decided to take a Sherman tank from the range to drive into the village, knocking down the entrance and bursting a water main as the tank spun round and round. Jefferis grew tired and decided to go home but the wife of the deputy director, Stuart Macrae, and one of the engineers then drove it off to Oving, demolishing the church steps when they decided to try and get it inside. There was then a particularly spectacular evening display as all manner of explosives were let off. The military police came to investigate the next morning, Macrae making his wife pay for the damage to the church steps and door.
At High Wycombe all the churches and public buildings were decorated with flags on the morning of 8 May. An American truck appeared in the High Street with a paratrooper and an airman waving to the crowds. There was a broom in the back and a notice on the bonnet, ‘Clear Sweep. Next Stop, Tokyo’. Crowds gathered on the Rye and at the Desborough recreation ground. There was dancing in the streets during the afternoon and into the evening with floodlighting on the Guildhall, the Municipal buildings, and the Library. Fireworks were let off throughout the town, one going through the open windows of the Red Lion but fortuitously someone doused the curtains which had caught fire. Someone watching from the ball on St Lawrence’s church at West Wycombe that evening described a holocaust of bonfires to be seen, especially around Booker.
At Marlow a large crowd gathered in Court Gardens with dancing from 8 p. m, until the early hours of Wednesday, interrupted only by the King’s broadcast at 9 p.m. There was a torchlight parade in Great Missenden with a bonfire in Bury lane with an effigy of Hitler as the guy. Church bells rang at both Penn and Tylers Green with services of thanksgiving at both.
Celebrations continued for some time. There was a Victory Dance in Hazells Hall in Aylesbury on 11 May, addressed by Major Elliot Viney, who had been captured during the epic defence of Hazebrouck by the 1st Bucks Battalion in in May 1940 and had arrived home only two days earlier. There were similar Victory Dances on 12 May in Buckingham Town Hall and Wolverton Drill Hall. Sunday 13 May was designated for general thanksgiving services, which were held throughout the county including at Princes Risborough, whilst that at Buckingham was followed by a Forces’ Victory Tea in the WVS Canteen. Between 7 and 8 p.m. that Sunday there was also a Victory Air Show over southern England staged by over 1500 bombers and fighters of the US Eighth Army Air Force, which included passing over their HQ at Wycombe Abbey. Victory Fetes were held at both Bierton and Great Horwood on 21 May whilst Gawcott put on a Victory Week from 2-9 June including fancy dress competitions, parades, whist drives and a jumble sale with all proceeds to its Welcome Home Fund.
It should not be forgotten, of course, that the war with Japan had not ended, the 99th (Royal Bucks Yeomanry) Field Regiment, Royal Artillery remaining in Burma. The Japanese surrender came unexpectedly at midnight on Tuesday 14 August following the dropping of the atomic bombs on Hiroshima and Nagasaki. It took most by surprise and the celebrations were more muted for VJ Day on 15 August. At Wolverton the Railway Works sounded its hooter for the alert and then the all clear to signify the final end of hostilities. At Stony Stratford a Scottish member of the Royal Signals produced bagpipes leading to an impromptu parade through the town with all manner of improvised instruments such as dustbin lids adding to the cacophony.
In looking forward to the then continuing war against Japan, the editorial in the Bucks Herald on 11 May invoked Churchill’s ‘concluding battle cry… Advance Britannia, Long Live the Cause of Freedom, God Save the King.’
Formation of St Paul’s Volunteer Cadet Corps, Stony Stratford
On This Day (9 February, 1876): St Paul’s College Volunteer Cadet Corps was formed at Stony Stratford.
The founders of the Victorian volunteer movement were keen that the perceived benefits of order and discipline emanating from military drill and codes should be extended to youths.
Eton College formed a volunteer corps in 1860, which was officially designated the 8th Bucks (Eton College) Rifle Volunteer Corps in May 1867. The Rev. Walter Short of St Paul’s College, Stony Stratford was then authorised to raise a corps on 9 February 1876.
A total of 26 boys aged over 17, 49 boys aged between 15 and 17, and one very tall 14 year old would form the cadet corps. Short also acted as the initial commanding officer for the new Wolverton Company although it transpired that he had not received the necessary certificate to be a captain when previously serving with the 1st Oxfordshire Volunteers.
The school, established by Rev W T Sankey in 1963 at High Street, Stony Stratford, was intended to educate the sons of clergymen, but young men from other well-heeled families also attended. Among its former pupils was General Sir John Eccles Nixon, a former Commander in Chief of forces in Northern India, and the first commander of the expeditionary force sent to Mesopotamia during the First World War. Nixon had the misfortune to be responsible for the initial ill-fated attempt to capture Baghdad, including the disastrous siege of Kut in 1915. As a result of this failure, he was sent home and replaced by Gen Sir Percy Lake, who failed to relieve Kut and was himself subsequently replaced by Gen Sir Stanley Maude. Forces commanded by Maude finally captured Baghdad in 1917.
The St Paul’s cadet corps seems to have disappeared about 1885.
RBH War Memorial Unveiled in Buckingham
On This Day (22 January, 1928): Crowds gathered in Buckingham for the unveiling of the Royal Bucks Hussars’ War Memorial.
The memorial, which commemorated the men who had died serving with the unit during the First World War, was unveiled by General Sir William Peyton, the wartime commander of the 2nd Mounted Division, to which the Bucks Hussars belonged. Over 1100 people, many of them ex-soldiers, lined the streets to watch the survivors parade to the church, a sight captured by Pathe News , which is available on YouTube, here: https://youtu.be/OHHym4RFyps.
The Bucks Hussars fought as infantry at Gallipoli during the Dardanelles campaign of 1915/16 and later in Palestine, where they resumed their mounted role, taking part in one of the last great cavalry charges at the Battle of El Mughar. They were deployed to the Western Front in June, 1918, where they were to convert to a Machine Gun battalion. On their first attempt to sail from Alexandria to Marseilles, their transport ship, the Leasowe Castle was torpedoed and sunk off Cyprus, with the loss of the Adjutant, Capt C H Bennett and three other ranks.
Eventually arriving at the British training base at Etaples on 28th June, 1918, the survivors completed their conversion to the machine gun role and became the 101st Machine Gun Battalion, seeing action at the Battle of the Scarpe (Arras) before moving to the Ypres sector, where they served until hostilities came to an end.
Bucks Militia Embodied For French Revolutionary Wars
4 January, 1793: The Bucks Militia was embodied (called out for permanent service) at the start of the French Revolutionary Wars.
Territorial Force Becomes Territorial Army
1 October, 1921: The Territorial Force was re-designated the Territorial Army.
At the end of the Great War in November 1918, the Territorials seemed superfluous when there was no risk of invasion and they could not be deployed realistically to imperial garrisons. By adopting the ‘Ten Year Rule’ in August 1919 the Cabinet also signalled the assumption that would be no major war in the immediate future.
Nonetheless, there was still a need for a functioning reserve albeit one, from the War Office point of view, that would display greater flexibility on general service liability and unit integrity than had been apparent in the war. After much discussion without any resolution on the Territorial role and liability, the Secretary of State for War, Winston Churchill, announced that Territorial recruiting would start again on 1 February 1920. The Territorial Army and Militia Act of 1921 then replaced all surviving older legislation on the statute book relating to the local militia (1812), volunteers (1863) and imperial yeomanry (1901). The legislation coming into effect on 1 October 1921 officially brought the Territorial Army (TA) into existence.
Territorial Army Mobilised for WW2
1 September, 1939: As German armour rolled over the Polish border, raising diplomatic tensions across Europe to fever-pitch, Britain completed the mobilisation of the Territorial Army (TA).
With the likelihood of war growing ever greater, Britain had ordered the doubling of the TA in April, 1939 as Hitler tore up the terms of the Munich Agreement.
Equipment shortages and a lack of instructors had dogged the expansion process in the intervening months, but as the situation deteriorated, a staggered mobilisation was ordered, beginning with the TA anti-aircraft and coastal defence units, which were called-up on 21 August. These were followed by the National Defence Companies on 25 and 26 August. Army Reservists were recalled to the colours on 31 August and the remaining elements of the TA were mobilised on 1 September.
Within weeks, however, the TA had pretty much ceased to exist as the Government enacted legislation to establish a single national Army. The Armed Forces (Conditions of Service) Act effectively suspended TA status for the duration of hostilities, and at the same time removed all the remaining restrictions on general service and transfer, meaning that former Territorial soldiers could be posted wherever they were needed. Further legislation extended all terms of service for as long as the war lasted, meaning that any Service person who was coming to the end of his or her engagement would be automatically extended for as long as required.
At 0900 on the morning of 3 September, the British Foreign Secretary, Lord Halifax, wrote to the German Government, stating that unless they were prepared to suspend all aggressive action against Poland, Britain would ‘without hesitation, fulfil its obligations to Poland’. At 1115 that morning, British Prime Minister, Neville Chamberlain broadcast to the nation to announce that Hitler had failed to respond and that “consequently this country is at war with Germany”.
The 1st Bucks Battalion and the 99th (Royal Bucks Yeomanry) Field Regiment, Royal Artillery, both moved to Newbury in mid-September whilst the 2nd Bucks Battalion remained in the county.
A Bucks Victoria Cross Winner
24 August,1914: Captain Francis Grenfell of the 9th Lancers, of Wilton Park, Beaconsfield, wins the VC at Audregnies, the first to be gazetted in the Great War.
Francis Octavius Grenfell (1880-1915) was one of nine sons of Pascoe Grenfell of Wilton Park. All had military connections, and five were to die on active service. Pascoe was killed in the Matabele rising in Rhodesia in 1896 and Robert in the charge of the 21st Lancers at Omdurman in September 1898. Reginald died in India in 1889 whilst Francis and his twin, Riversdale (‘Rivvy’), were both killed in the Great War. Of the remainder, Harold took part in the disastrous Jameson Raid in South Africa in 1896, whilst Cecil and John both commanded the 1/1st Royal Bucks Hussars during the Great War and Arthur had served in it before the war.
Francis was commissioned into the 3rd Seaforth Highlanders before joining the King’s Royal Rifle Corps in 1901. After service in South Africa and India, he transferred to the 9th lancers in 1905. Covering the retreat from Mons, the 9th Lancers was ordered to charge advancing German infantry at Audregnies on 24 August 1914. Casualties were heavy with Francis receiving wounds to his hand and thigh whilst trying subsequently to help a field battery that had also taken heavy losses to get its guns away. Invalided home, Francis returned to his regiment in October 1914 and was wounded again by shellfire near Messines on 31 October. Hospitalised in Dublin, Francis learned of the award of the VC for Audregnies on 17 November. It was for ‘gallantry in action against unbroken infantry at Andregnies and for gallant conduct in assisting to save the guns of the 119th Battery, Royal Field Artillery, near Doubon the same day’. It was the first gazetted VC of the war, although subsequently five VCs for Mons on 23 August were gazetted. Francis received his VC from the King on 22 February 1915, having to shake the King’s hand with his left hand. Returning to his regiment, he was killed whilst converting a communication trench into a fire trench during the Second Battle of Ypres on 24 May 1915. He was buried in the churchyard at Vlamertinghe. His twin, ‘Rivvy’, had been killed also serving with the 9th Lancers on the Aisne in September 1914.
As the twins had been born at Hatchlands, East Clandon, Surrey, a VC memorial paving stone to Francis was placed in Guildford High Street in August 2014, but a duplicate was then placed at Beaconsfield in November 2014. The VC is displayed in the Regimental Museum of the 9th/12th Royal Lancers in Derby Museum and Art Gallery. A painting of Grenfell leading the charge at Audregnies, ‘The First VC of the European War’, by Richard Caton Woodville is in the National Army Museum, Chelsea.
NB: It is important to note that Grenfell’s VC was the first to be gazetted for the Great War. However it was not the first to be won in that conflict. That distinction goes to Lt Maurice Dease, an Irishman from County Westmeath, who was awarded the medal for bravery whilst commanding the Machine Gun Platoon of 4 Royal Fusiliers at Nimy railway bridge, near Mons, on 23 August, 1914.
2/1st Bucks Battalion at Passchendaele
On This Day (23 August, 1917) The 2/1st Bucks Battalion was pulled out of the line and marched to billets near Goldfish Chateau, east of Ypres, to recover after sustaining heavy casualties in an attack on German positions to the south-east of St Julien.
The 1/1st Bucks Battalion (48 (South Midlands) Division) having attacked north of St Julien a few days earlier, the 2/1st Bucks, part of 184 Infantry Brigade, attached to 61 (2nd South Midlands) Division, entered the Battle of Passchendaele (officially known as the Third Battle of Ypres) on 22 August, 1917.
The action was part of a 184 Brigade attack designed to capture the German line along the Kansas Cross-Winnipeg road and was an important element of a phase of Passchendaele known as the Battle of Langemarck.
According to the Orders for the attack, issued by the Commanding Officer of the battalion, Lt Col John B Muir, on 20 August, 2/1st Bucks were to advance on the right while 2/4th Oxfordshire and Buckinghamshire Light Infantry would be on their left. The Bucks Battalion was to go forward on a two-company front of 700 yards, C on the left and B on the right, followed by D (left) and A (right). Zero was set for 0445 on 22 August and the plan was for the leading waves to by-pass the various enemy strongpoints and concrete blockhouses and head straight for the final objective, along the Kansas Cross-Winnipeg road, about 1400 yards to their front. Eight platoons (two companies) of 2/4th Royal Berkshires were detailed to ‘mop up’ the bunkers. Four tanks were tasked to support the infantry in dealing with the strongpoints.
The Battalion War Diary records:
“…Punctual to the second, there is a terrific roar, heard for miles around, and our barrage is down. Slowly the waves advance under the protecting wall of smoke and flame. The sky is lit with lights of all colours and descriptions, the Hun’s appeal for help; then his barrage descends, but too late to be of use, for it is well behind the advancing troops. Obeying their orders, the waves push on, disregarding the enemy’s formidable strong points and blockhouses…”
After this, as the war diarist himself admits, the situation becomes ‘somewhat confused”. However, it appears that the leading waves headed straight for their main objectives, but the follow-on troops found it impossible to make headway in the face of heavy artillery, machine gun and rifle fire from the strongpoints and bunkers, which came into action as soon as the British rolling artillery barrage passed them. Although it is believed some of the early waves succeeded in reaching the Kansas Cross-Winnipeg road, they were effectively cut off from their supporting troops and most were either killed or taken prisoner. Behind them, Somme Farm fell to 2Lt St Ledger and three men of the Royal Berkshires, who captured 3 machine guns and killed 14 occupants. Aisne House was captured but re-taken almost immediately. The flanking units’ failure to take Pond Farm and Gallipoli strongpoints added to the Bucks Battalion’s problems as this left them vulnerable to being enfiladed from both flanks, although both were eventually captured, easing the situation for the Bucks. During the day a company of the reserve battalion, 2/5th Gloucesters, under 2Lt Johnston, moved up and began to consolidate a line of shell holes around Somme Farm, holding it in the face of several determined counter-attacks, which were broken up by artillery, machine gun and rifle fire. The War Diary makes no mention of the tanks, which would likely have struggled to operate in the muddy ground conditions.
The Bucks Battalion was relieved by the 2/7th Worcesters late on the evening of 22 August and made its way back through Ypres to Goldfish Chateau, arriving around 0500 to begin counting the high cost of the day’s fighting.
Casualties
The 2/1st Bucks Battalion went in to the attack with 13 Officers and 637 Other Ranks. When the roll was called on 23 August, 11 Officers and 338 ORs failed to answer to their names. Of these, 39 were recorded as killed in action, 153 were wounded and 146 were missing (some of the latter were later confirmed as prisoners of war). The Officer casualties included:
Killed in Action – 2Lt Tyson, B Company.
Died of Wounds – Capt J E S Wilson MC (the unit’s Medical Officer); 2 Lt S A C Gibson, D Company; and 2Lt W R Gill, D Company.
Wounded in Action – Capt G C Stevens and 2Lt T S Markham, C Company; 2Lt G P Steed, A Company; 2Lt C V Hilll, D Company; and 2Lt W H Petrie, B Company.
Bucks Hussars In Action At Gallipoli
21 August, 1915: The 1/1st Royal Bucks Hussars suffer 137 casualties in an attack on Turkish positions on Chocolate and Scimitar Hills, Gallipoli.
The 2nd (South Midland) Mounted Division (minus its horses) arrived from Egypt via Mudros to take part in the last major allied offensive of the Gallipoli campaign and, indeed, the largest single day’s action.
On 21 August 1915 the Mounted Division, including the 1/1st Royal Bucks Hussars, was to advance across the dry and exposed Salt Lake towards Chocolate and Scimitar Hills (see map). The yeomen moved up to the hill known as Lala Baba on the night of 20/21 August. The artillery bombardment opened at 1430 hours, the timing intended to take advantage of the sun in the west illuminating the Turkish positions and also handicapping Turks firing into the glare. Unfortunately, there was a mist blurring the objectives and also providing a background to the attackers so far as the Turks were concerned. In addition, limited ammunition meant that the bombardment lasted only half an hour.
When the 29th Division could make no headway against Scimitar Hill, the yeomen were ordered to advance to their support at 1730 hours. Advancing in extended order, the 5,000 men of the division’s five brigades were an easy target for Turkish artillery as they began their attack. Shells also set light to the low scrub beyond the Salt Lake. Many men halted under cover of Green Hill to the west of Scimitar Hill, but Brigadier General Lord Longford of 2nd (South Midland) Mounted Brigade, including the Bucks Hussars, led a charge over Green and Chocolate Hills, up the summit of Scimitar Hill. Despite the heavy casualties, the yeomen pressed up Chocolate Hill and, with fixed bayonets, charged up Scimitar Hill. After three attempts, the 2nd Mounted Brigade gained a foothold in the Turkish trenches but was driven out, retiring to a gully where they remained to cover the evacuation of the wounded. Longford was among those killed.
The brigade moved back to Chocolate Hill during the night. Out of 9 officers and 250 other ranks who participated, the 1/1st Royal Bucks Hussars had one officer and 32 men were killed, with four taken prisoner. In the campaign as a whole, a further eight men were killed or died of wounds, and six officers and 89 men were wounded or invalided. The regiment’s Machine Gun Officer, Lieutenant J. D. Young won the MC.
The attacking formations as a whole suffered over 5,300 casualties on 21 August. Such were the losses of the yeomanry that two composite brigades had to be formed, the 1st Composite Mounted Brigade from the former 1st, 2nd, and 5th Brigades, and the 2nd Composite Brigade from the former 3rd and 4th Mounted Brigades. The front line then remained between Green Hill and Scimitar Hill until the evacuation of Suvla in December. The Bucks Hussars mounted no further attacks but held trenches on and in the vicinity of Chocolate Hill until the end of September. Further casualties and sickness continued to take a toll and, on 1 November 1915, the 1/1st RBH transferred back to Mudros, returning to Egypt three weeks later.
Writing about the fighting for the hills, British war correspondent, Ellis Ashmead-Bartlett, a thorn in the side of the senior military commanders thorughout the Gallipoli campaign, said: “Why on earth they (the Yeomanry) were brought across the Salt Lake in broad daylight under heavy shrapnel fire, instead of being massed behind Chocolate Hill under cover of night, remains a mystery to this day. But this is only on a par with everything else…”
Bucks Battalion Enters Battle of Passchendaele
6 August, 1917: The Bucks Battalion entered the horror that was the Third Battle of Ypres (Passchendaele).
After the Battle of the Somme closed down in November, 1916, the Bucks Battalion spent the spring and early summer of 1917 taking part in the pursuit of the German army as it moved East to strong, pre-prepared positions known as the Hindenburg Line.
By late July, however, the Bucks men found themselves back in Belgium, at Ypres, the sector in which it had been introduced to the business of trench warfare in 1915.
Back then, Ypres had been a relatively quiet sector but there was nothing ‘quiet’ about their return, coinciding, as it did, with the artillery bombardment heralding the start of the Third Battle of Ypres, also known as Passchendaele.
The battle began on the morning of 31 July, 1917 with an attack to secure the high ground of the Pilckem Ridge. As at the Somme, the Bucks Battalion did not take part in the early assaults, but on 13 August it received orders that would take it right to the tip of the British spear with an assault on German positions on a ridge on the east bank of the STEENBEEK stream, just north of the village of St Julien.
St Julien lies a couple of miles to the north-east of Ypres, close to the STEENBEEK a narrow brook which runs from north-west to south-east. By mid-August, 1917, after early advances, the British line lay close to the west bank of the stream while the Germans had arranged their defences in shell-holes, reinforced farm buildings and concrete blockhouses along a low ridge about 150-200 yards to the east.
The attack, scheduled for 16 August, was part of a general advance along the whole of the 2nd and 5th Armies’ front. 145 Brigade’s objective was the high ground overlooking the valley of the STROOMBEEK, another stream which ran in a valley to the north-east of St Julien, overlooked by the village of Passchendaele. The Brigade was to attack ‘three-up’ with 1/5 Gloucesters on the right, the Bucks Battalion in the centre, and the 1/4 Oxfords on the left, with 1/4 Royal Berkshires in reserve.
After spending much of the day resting near the canal at Ypres, the Bucks Battalion started moving to its forming-up positions at 11pm, The Battalion was to ‘shake out’ behind the west bank of the STEENBEEK on a 500 yards front, immediately to the north of St Julien. The unit was organised in four waves, each on a two-platoon front, with A Company on the left and B on the right, followed by C (left) and D (right).
The first wave was tasked with capturing HILLOCK FARM and a line of gun-pits to its right. The second wave was to take Springfield and points to its left and right, while the two following waves were allocated objectives further east. Zero was set for 0445. Three of C Company’s four platoons were delayed on their way to the forming up position, which was just west of the stream, and were unable to play any significant part in the advance.
A and B Companies crossed the STEENBEEK at Zero-7 (0438), losing a few men to their own bombardment before it lifted onto targets further back. Unfortunately, due to the poor ground conditions, the attackers were unable to reach the German front line before the guns lifted and they came under heavy machine gun and rifle fire as they topped the low ridge. The battalion war diary records:
“The leading wave of the right company, B, was almost entirely annihilated by this fire. The second wave closed up and engaged the enemy while parties worked round the flanks but the enemy kept up a very strong resistance and until the third wave joined in and closed on them with a rush, they showed no signs of giving in.”
However, after this charge, and a short bout of hand-to-hand fighting, the enemy, in and around one house, surrendered and the other garrisons soon followed. It was now about 0600.
Meanwhile, the left-hand company met with less resistance at first, but after advancing about 150 yards east of the STEENBEEK they came under a very heavy cross-fire from machine guns, reaching the gun pits with only about 16 men. The second wave closed up but the left platoon could make no progress in the face of heavy fire from the left gun pit and a trench immediately north east of it, as well as from Maison du Hibou and Triangle Farm. However, the right platoon of the second wave went straight through, passing south-east of HILLOCK FARM and reaching SPRINGFIELD and the road to the left of it by about 0645.
On the right of the attack it proved impossible to make progress as there was a large expanse of standing water to the front and all around the ground was, to quote the war diary, ‘little short of a morass, with a blockhouse and gunpits on the far side held by enemy machineguns and a number of snipers’. Here, every attempt to get forward resulted in casualties.
About midday, casualties on the left had become so numerous that it was decided to withdraw from HILLOCK FARM and take up a new position south of it, and later to pull back even further. By evening it also became evident that the battalion no longer held SPRINGFIELD.
The day’s fighting had been costly for the Bucks Battalion. One officer was killed during the attack (Capt G V Neave, commanding C Company), and another (Capt G R F Knight, commanding A Company), died of wounds the next day. Eight other officers were wounded. 43 Other Ranks were killed in action, with a further 49 missing and 193 wounded. The battalion was relieved by 1/8th Royal Warwicks on the night of 17 August and the men made their way back to billets at Dambre Camp, north of Vlamertinghe.
Skyline Trench Obliterated But Bucks Battalion Hangs On…
15 Aug, 1916. Having secured Skyline Trench, the next challenge for the Bucks Battalion was to ensure it remained in British hands.
While the operation to re-take the trench had been relatively painless, the battalion was about to pay a high price to keep it.
At about 1130 on 15 August the enemy opened a concentrated bombardment on the right portion of 5th Avenue, and at midday on Skyline Trench, making use of their heavy guns, trench mortars, and minenwerfers from Mouquet Farm. Shells of all natures were ‘flung with unerring accuracy’, and the artillery fire continued unabated for nine hours, systematically destroying the frontline trench. By 1500 the battalion was struggling to hold the tops of the communications trenches and a few posts in the main line, as casualties mounted, particularly among C and D Companies. Recalling the shelling afterwards, the battalion’s adjutant and author of its war history, Capt Philip Lowndes Wright, DSO, MC, described it this:
“That men lived at all in such a place of death, when shells were bursting above them, under them and around them, was nothing short of a miracle.
“There were but few unwounded, and when at 8pm it became necessary to send up B Company to relieve the remnants of C and D, the survivors were found to be dead-beat both physically and mentally.”
Surprisingly, there was no enemy attack, and by 9pm the shelling began to ease. In an effort to reduce casualties it was decided that the remains of Skyline Trench should be evacuated , and that posts should be pushed out into shell-holes in front of it. Meanwhile, A Company, working alongside 1/5th Gloucesters, took the opportunity to deliver a bombing attack against a portion of trench on the left still in enemy hands. The attack was pressed home with great determination, no doubt as pay-back for the artillery bombardment. Casualties were heavy, but the enemy managed to hang on and eventually the assault was called off due to a shortage of bombs (hand grenades).
According to Capt Wright, the shelling of Skyline Trench and 5th Avenue was “undoubtedly the heaviest and most prolonged that the battalion had ever undergone, and the endurance of all ranks throughout was of the very finest”.
Counting the cost, Wright records that casualties over the course of the day were as follows:
Officers. Wounded: Capt V C Heathcote-Hacker, Lt F D Earle, 2Lt F C Dixon, 2Lt D Fallon. Other Ranks: Killed – 8; Wounded – 165, Missing – 20.
He added: “It is certain that all the missing were killed, and so killed that no trace could be found of them. The casualties included many of our best NCOs, among whom may be mentioned Sgts H Watts, C Fowler, A J Hart and W G Cartwright.”
At 1100 on 16 August the exhausted battalion moved back to new bivouacs between Bouzincourt and Albert to await their next contribution to the Battle of the Somme.
Bucks Battalion ‘Winds Up’
7 August, 1946: The First Bucks Battalion was wound up after service in World War 2.
Having landed on SWORD Beach in Normandy on D Day, and participated in the Allied advance across France and Belgium during 1944, the battalion had been split into separate companies to become part of T (Target) Force, whose role was to secure German technology and scientific installations before they could be sabotaged or captured by the Soviets.
The companies were reunited at Menden in the Ruhr on 7 June 1945, although the T Force role continued for the battalion until the Spring of 1946 when it was detached from the Force. However, it left behind a small nucleus to form No 1 T Force, whose work continued with added impetus as the relationship between the allies deteriorated.
The Bucks Battalion passed into suspended animation at Ghent in June, 1946, and was finally ‘wound up’ on 7 August, 1946.
Bucks Battalion Back in Action in Somme Battle
13/14 August, 1916: After a welcome rest period at Domleger, following their exertions in front of Pozieres in late July 1916, by 9 August the First Bucks Battalion was back on the road, marching towards the sound of the guns once more.
The battalion retraced its route back to the front over two days and on 11 August they found themselves in the familiar village of Bouzincourt, north-west of Albert. Having just taken over their new billets, the Germans welcomed them back with a salvo of seven or eight heavy shells, indicating that they had the location well zeroed-in. This prompted a rapid move to old gun-pits to the west of Usna Redoubt, south of Ovillers, just off the Albert-Bapaume road, where they were to be in Brigade Reserve.
The remainder of 145 Brigade was tasked to hold the line immediately west of Pozieres on the crest of the ridge bearing the same name. The frontline trench here was known as 6th Avenue or Skyline Trench (see map). The Australians were on their right, around the Pozieres Windmill, while to their front Mouquet Farm remained firmly in German hands.
On the night of 13/14 August a heavy enemy attack drove the 1/4th Oxfordshire and Buckinghamshire Light Infantry (OBLI) out of the left of their section of Skyline Trench, although the right sector managed to cling on, launching a number of bombing attacks on the invaders. However, these local counter-attacks did not relieve the situation, nor did a deliberate attack by three companies of 1/4th Royal Berkshires at 5am on the 14th.
At noon, the Bucks Battalion relieved the 1/4th Oxfords. A Company took over 5th Avenue, with B and C Companies occupying 3rd Avenue. D Company remained in Ovillers until dark and then moved up into the line.
Two communications trenches connected 5th Avenue and Skyline Trench (see maps). Shortly after 2200 A Company sent two bombing sections up the left communicator while C Company sent bombers up the right-hand trench. On the right 2Lt D Fallon and his men reached Skyline Trench without incident and then pushed right to link up with the ANZACs. On the left A Company bombers reached Skyline Trench and pushed left, establishing a bombing block to protect that flank – map ref X.2.b.8.82. Lt J F Arnott and a platoon of D Coy then followed on up the right-hand communicator and pushed left to join up with A Company. By about 0500 Skyline Trench was back in British hands.
Organising Committee Established to Oversee War Recruiting
13 August,1914: The Bucks County Organising Committee is formed to oversee army recruiting for the war.
Appointed Secretary of State for War on 5 August, Field Marshal Lord Kitchener had not served in the home army since the 1880s and had become autocratic in his various imperial proconsular roles. He instinctively distrusted what he saw as ‘amateur’ County Territorial Associations and chose to expand the army through the War Office rather than CTAs as had been anticipated before the war.
With men coming forward to enrol in both the Territorials and Kitchener’s ‘New Armies’, confusion reigned. The County Organising Committee was established on 13 August 1914 to make arrangements for relief efforts for servicemen’s dependants as well as for any potential emergencies but also to oversee recruiting.
A total of 27 recruiting agents – all serving soldiers – were organised through the county, basing themselves at location such as the Queen’s Hotel in Wing and the Institute at Burnham. The principal recruiting centres were established in Temple Square in Aylesbury and in the Liberal Club opposite High Wycombe railway station.
Subsequently, the committee was tasked with defence arrangements in the event of any German invasion of East Anglia.
The Bucks central committee comprised Lord Rothschild as Lord Lieutenant; the Earl of Buckinghamshire; the High Sheriff (then Henry Turnor of Cholesbury), Walter Carlile, MP; Lord Desborough; the chairman of the CTA, Tonman Mosley (later Lord Anslow) of Bangors Park, Iver; the clerk of the lieutenancy and Aylesbury solicitor, Julian James; Colonel Philip Pope of Datchet; the secretary to the CTA, Major General J. C. Swann; the chief constable, Major Otway Mayne; Colonel Alexander Finlay of Little Brickhill; and High Wycombe’s mayor (then John Gomm).
Bucks Territorials Mobilised for WW1
4 August, 1914: On the day Britain declared war on the German Empire and its allies, the part-time soldiers of 1/1st Bucks Battalion and the Royal Bucks Hussars were mobilised.
Mobilisation of the Territorial Force was ordered at 1830 on Tuesday 4 August 1914, Britain’s ultimatum to Germany to withdraw its forces from Belgium then expiring at 2300. The Bucks Battalion, which had been recalled from its annual camp at Bovingdon Green, Marlow, on 3 August assembled at its company locations early on 5 August at Aylesbury, Buckingham, High Wycombe, Marlow, Slough and Wolverton. Likewise, the Royal Bucks Hussars assembled at its squadron headquarters at Aylesbury, Buckingham, Chesham and High Wycombe. The Bucks Battalion left for Cosham that evening to dig trenches for the defence of Portsmouth whilst the Royal Bucks Hussars moved to Reading on 11 August 1914 and thence to the east coast. July, 1889: The foundation stone was laid for the new regimental headquarters of the 1st Bucks Rifle Volunteers at Marlow.
Foundation Stone Laid for RVC HQ
31 July, 1889: The foundation stone was laid for the new regimental headquarters of the 1st Bucks Rifle Volunteers at Marlow.
The headquarters had been moved to Marlow when the Marlow brewer, Owen Peel Wethered, took command of the battalion in 1872. The new headquarters was largely built by the Wethereds and was adjacent to the Marlow Institute in Station Road. The building was officially opened in September 1890.
Bucks Battalion Memorial Unveiled
29 July, 1922: The 1/1st Bucks Battalion War Memorial and Altar was unveiled in St Mary’s Church, Aylesbury.
A War Memorial Committee for the 1/1st Bucks Battalion had been formed in November 1921 and fundraising commenced. A Portland Stone tablet was designed by Esmond Burton, above an oak altar in the North Chapel. Above the altar were hung three flags which were used successively to mark the battalion headquarters during the war.
The Chapel was unveiled by the Honorary Colonel, Lord Cottesloe, and dedicated by Bishop Edward Shaw, Archdeacon of Oxford.
The cost of the Regimental Chapel was £194.9s.2d., which paid for the Memorial Tablet, the oak altar table and embroidered hangings, a crucifix and altar candlesticks, and a Persian rug from Liberty’s in Regent Street, London which cost £7.10s. The funds were raised by donations within the Buckinghamshire Battalion.
A memorial to the 2/1st Bucks Battalion had been unveiled in St Mary’s on 30 October 1920.
Somme 1916 – Bucks Battalion Continues The Fight For Pozieres
22/23 July, 1916: Between 20 and 22 July, the 48th (South Midland) Division continued to try to make progress towards the heavily fortified village of Pozieres while the 1st Australian Division hammered its way towards the same objective from the south and south-east. But it was hard going, particularly for the South Midlanders, attacking from the west across the warren of old German trenches which criss-crossed the ground.
On the night of 22/23 July, 145 Brigade had some success: 1/4th Oxford and Buckinghamshire Light Infantry and 1/4th Royal Berkshires secured a section of enemy trench line just south of the old light railway track that ran from Poziers to Ovillers. However, 1/5th Gloucesters, assaulting on the extreme left, had been unable to get forward, creating a ‘kink’ in the line and leaving the Berkshires with a dangerous open left flank. At around 0300 the Bucks Battalion’s CO was called to Brigade HQ for orders, returning at 0400 with the news that the battalion was to attack over the same ground that had defeated the 1/5th Gloucesters. Zero was set for 0630.
The position to be attacked was a stretch of line approached by two communications trenches, each about 400 yards long, running north-east. Covered by an artillery bombardment of the German line, D Company was to proceed along the eastern trench until they reached a bombing block about 140 yards from the German line. B Company, on the left, was to approach via the western trench. Having reached their jumping-off position, both companies were to extend inwards so as to link up with each other and rush the German line as soon as the artillery fire lifted.
The battalion war diary recalls:
“D Company (Capt E V D Birchall) moved out of the (communications) trench to their jumping off place amid a barrage of 15cm shells in a very steady manner. They then extended and rushed the German front line before our own barrage had lifted. It was entirely down to this that they were enabled to carry out successfully what two other similar enterprises had failed to accomplish. This was confirmed by a captured German officer who stated that they were taken entirely by surprise and were waiting for the British barrage to lift.’
B Company (Capt O V Viney) was badly held up by the British bombardment, which caused casualties, damaged the communications trench and made movement difficult and slow. They arrived at the jumping off point too late to take part in the assault but one platoon and a Lewis Gun team managed to gain the German trench.
A Company (Capt N S Reid) moved up the western communications trench as soon as D Company entered the German lines, pushed down the bombing block and entered the front line trench to begin consolidation, sending a bombing section to the right to make contact with 1/4th Berkshires. A platoon of C Company was sent up to reinforce the left of the captured trench and the remainder of the company was employed carrying up Small Arms Ammunition and bombs.
About 150 Germans and two officers surrendered to the Bucks Battalion and two machine guns were captured. Frequent enemy bombing attacks were beaten off during the course of the day. In the evening, C Company took over the front line, assisted by about 60 men from the other three companies. The battalion was relieved by 1/5th Gloucesters at noon on 24 July and returned to bivouacs near Albert to count the cost. It was an expensive operation. The war diary recorded:
Killed: 8 Other Ranks.
Wounded: Capt E V D Birchall (later died of wounds), Capt O V Viney, Lt E N C Wollerton and 70 ORs.
Missing: 8 ORs (all later presumed killed).
In his battalion history, Capt Philip Lowndes Wright also includes 2Lt R E M Young and 2Lt F Niall among the wounded and names CSM R Read and Sgt F Barrett among the dead.
The attack marked the last action by the Bucks Battalion for the remainder of the month of July, 1916. The 10 days of hard fighting had left their mark on the battalion, The strength was significantly reduced, and the loss of so many NCOs was a particular problem. The news that the whole division was being withdrawn into rest was greeted with some relief and at 0700 on 26 July the Bucks Battalion marched back to temporary billets at Arqueves, where it remained for 48 hours before carrying on further back to Domleger.
First Bucks Battalion’s Somme Nightmare Continues
20/21 July, 1916: Having made their first foray into the Battle of the Somme, conducting a ‘reconnaissance in force’ on enemy positions near Pozieres on the night of 17/18 July, the First Bucks Battalion moved back to billets at Bouzencourt to await developments. They did not have to wait very long.
On the night of 18/19 July, 2Lt R E M Young led an uneventful patrol of 12 men of B Company to reconnoitre the German wire in front of Pozieres, moving northwards from the Albert-Bapaume Road. At 5pm that evening the battalion moved up through Albert taking over bivouacs to the north-east of the town, just off the old Roman road in preparation for a continuation of operations by 48 Division towards Pozieres the following night.
The Bucks Battalion’s objective for 20/21 July was a small section of the enemy line to the west of Pozieres village and the trenches in the immediate vicinity, with the 1/5th Gloucestershires attacking on their left. The plan was for the Bucks men to attack in four waves, one behind the other, on a two-company front with C Company on the right and A Company on the left. B Company would follow behind, supporting both forward companies.
A white tape had been laid about 175 yards from the German front line by Royal Engineers to mark the jumping-off point.
The attacking companies assembled in Sickle Trench and moved towards the tape at 0230, just as the enemy began to send up numerous white flares, followed, after a few minutes by red flares. The red flares were the cue for the defenders’ machine guns to open fire, sweeping no-man’s land and British front line.
At 0245 an intensive artillery barrage opened on the German front line, lifting at 0247. The ‘lift’ was supposed to be the signal for the attackers to rush the enemy positions but, as the battalion war diary records:
‘The attack could not be pushed home owning to the large number of machine guns, though one party, consisting of a corporal and six men succeeded in entering the German line on the extreme right…”
The Bucks Battalion’s casualties were heavy:
Officers:
Killed: Capt L W Crouch, 2Lt C G Abrey, 2Lt J P Chapman, 2Lt C W Trimmer
Wounded: 2Lt B C Rigden (who had distinguished himself during the earlier ‘recce in force’), 2Lt H C E Mason, 2Lt H V Shepherd.
Other Ranks:
Killed: 7
Wounded: 97.
By 0900 on 21 July, the survivors were withdrawn and returned to bivouacs behind the lines. But they were not finished with the Somme or Pozieres. In the early hours of 23 July they received new orders for a further attack, scheduled for 0630 that day.
2/1st Bucks Battalion Takes Heavy Casualties at Fromelles
19 July, 1916: While the First Bucks Battalion recovered from its entry into the Battle of the Somme near Pozieres on the night of 17/18 July, 1916, the Second Bucks Battalion was preparing to take part in a diversionary attack about 50 miles to the north, near the French village of Fromelles.
Fromelles lies between Lille and Bethune, in what had been a relatively quiet sector of the Western Front since the ill-fated attack on the Aubers Ridge in May, 1915.
With the Somme fighting raging to the south and casualties mounting on both sides, the German defenders began to withdraw troops from quieter parts of the line to reinforce their beleaguered forces in the battle zone. British intelligence already had evidence that the Germans had ‘thinned out’ their line at Fromelles to bolster the Somme front.
In an effort to arrest this flow of fresh troops, and thus support the attacking Fourth Army, GHQ ordered the commanders of the First, Second and Third Armies to conduct operations to pin down German forces on their fronts. Lt Gen Sir Richard Haking, GOC XI Corps, proposed to First Army commander, Gen Sir Charles Munro, that an attack on the Sugar Loaf in front of Fromelles at the junction of First and Second Armies could have the desired effect, and pinch out a bothersome salient in the German lines at the same time.
It was decided that the attack would be conducted as a joint First/Second Armies operation involving the newly-arrived Australian 5th Division (II ANZAC Corps, Second Army) and 61 (2nd South Midlands) Division, part of Haking’s own XI Corps. The latter was a second-line ‘mirror’ of 48 (South Midland) Division, formed in August, 1915, which had arrived on the Western Front in late May, 1916.
The task allotted to the Second Bucks Battalion (left) was to attack together with 2/4 Royal Berkshires (right) on a two-battalion front between Sunderland Avenue and Bond Street (see map). The limit of exploitation was set at the enemy’s support line.
The attack opened at 1100 on 19 July with an artillery bombardment concentrating on the German front line. The infantry attack was scheduled to commence at 1800.
By 1730 the Bucks unit had lost nearly 100 men killed and wounded by shell-fire. As the battalion diary records:
“This was serious as the previous day A Company had lost 78 men gassed when a friendly shell burst a gas cylinder in their lines.”
As a result, the battalion went into action severely under-manned with 20 officers and 622 other ranks. There would be many fewer by the time the attack concluded.
At 1740 what was left of A and D Companies crawled out into No Man’s Land via Rhonnda Sap and lay down in four waves. At 1800, with a cheer, the attackers leapt up and assaulted the enemy trenches. The war diary continues:
“Even before 5.40pm the enemy’s machine guns had become busy and at 6.00pm they mowed down our advancing waves so that only a few actually reached the German parapet. These did not return.”
By 1830 it was clear that the attack could not succeed. However, 184 Brigade ordered the Commanding Officer, Lt Col H M Williams, to re-organise the remnants of his force and attack again at 2030. This was postponed at 1930 and mercifully cancelled at 2000.
The cost in human capital was enormous. The war diary records:
“Every officer who went out with the assaulting companies was either killed or wounded. Capt HSG Buckmaster was the only officer who went out into No Man’s Land who came back physically unhurt.”
During 18/19 July the battalion lost 322 all ranks. The details are:
Officers:
Killed: Capt H C Crouch, Lt C P Phipps, 2Lt H R N Brewin, 2Lt F R Parker.
Wounded: 2Lt H G Bradley, Capt I Stewart-Liberty, 2Lt A T Pitcher, 2Lt B H Drakes, 2Lt G D W Oliver, 2Lt T J Relf, 2Lt J S Rutherford, Capt V W G Ranger.
Died of Wounds: Lt D G Chadwick.
Missing: 2Lt R B Hudson, Lt G W Atkinson.
Other Ranks:
Killed – 62.
Wounded – 180.
Missing – 65.
Overall, the attack was assessed by the battalion’s war diarist as being unsuccessful in that the enemy’s trenches, though penetrated, were not consolidated or held.
“But,” he continued, “A very great measure of success was obtained in that:
1. The enemy suffered severe casualties.
2. He was, and will be, prevented from withdrawing either infantry or guns for the support of his forces further south on the Somme.”
61 Division suffered 1,500 casualties at Fromelles while the Australian 5th Division lost 5,500.
Bucks Battalion Enters the Somme Cauldron
18 July, 1916: The Battle of the Somme in July 1916 started relatively quietly for the men of the 1/1st Bucks Battalion… but it would not be too long before they were right in the thick of the fighting.
Although two battalions of the 48th Division – 1/6th and 1/8th Royal Warwickshires (143 Brigade) – were thrown in to the fight on 1 July, supporting 11 Brigade (4th Division) in its attack on the Heidenkopf strongpoint to the south-west of the village of Serre, the remainder of the South Midland formation was held in Corps Reserve. 144 Brigade and 145 Brigade were to be prepared to relieve 10 Brigade and 12 Brigade (4 Division) most likely on the second night of operations and probably on the Grandcourt-Puisieux ridge, while the non-assaulting battalions of 143 Brigade were to stand by to exploit any successes achieved by 11 Brigade.
For the Bucks Battalion, part of 145 Brigade, this meant being taken out of the line on 22 June, relieved by the 1/5th Royal Warwickshires, and marched back to billets in Couin, about four miles behind the front.
On 1 July, with the sounds of battle all around them, they moved on foot to Mailly-Maillet, where they were to be in Divisional Reserve for a planned attack by 144 Brigade and 145 Brigade, scheduled for 3 July. However, that operation was subsequently cancelled and instead they tramped back to huts in Couin and then to Coigneux, where they took part in company training before relieving 1/4th Oxfordshire and Buckinghamshire Light Infantry (OBLI) in trenches in the familiar surroundings of Hebuterne. By then the bright summer sun and clear skies that had greeted the opening of the battle had been replaced by heavy rain which left the Hebuterne sector in a very poor state with ‘many places flooded’.
Relieved on the morning of the 12th by 1/4th OBLI, the Bucks Battalion went back to Coigneux and then Senlis before, on 17 July, receiving orders that would take them into the crucible of battle. Their task was to conduct a reconnaissance in force of a number of points in the enemy lines in front of the village of Pozieres, on the old Roman road that runs between Albert and Bapaume.
Orders for the operation specified that the task was to find out if the enemy was holding the various locations. If the points were not held the attackers were to occupy and fortify them as strongpoints. Heavy fighting was to be avoided.
The job was given to A and D Companies, under the command of Capt E V Birchall. Each company was allocated a sector containing two of the points to be attacked. In turn the companies allocated a platoon to each objective.
At 0100 on the morning of 18 July, the platoons left their assembly area at Sickle Trench, part of which was located close to where the south-west wall of the Pozieres British Cemetery now stands, and headed towards the enemy lines. Of the four platoons, only one, led by 2Lt B C Rigden, managed to enter the enemy trench system, the others being held up by heavy machine-gun fire. Rigden and his men set about erecting a barricade and fortifying the position, driving off repeated bombing attacks by the Germans before being recalled due to the lack of success of the other attacks. 2Lt Rigden was awarded an immediate Military Cross. Fellow platoon commanders, 2Lt C Hall and 2Lt R C Norwood were not so lucky. Hall received a serious head wound whilst helping to bring in wounded, and died later. Norwood was wounded and seen to fall during the initial assault. Although his men made attempts to find him, it was a very dark night and they were unsuccessful. He was later posted as missing, presumed killed. However, Norwood’s story did not end there. After the war, members of a Canadian burial party helping to clear the battlefield around Pozieres in 1920, was working just in front of the northern end of Sickle Trench (see map) when they found the decomposed remains of a British officer. The remains were identified as those of Robert Cecil Norwood and he was reinterred in the nearby Imperial War Graves Commission Pozieres British Cemetery where he now lies in Plot 1, Row C, Grave 39 – just a few hundred yards from where he fell.
The Battalion War Diary records that despite the failure to take and hold any of the objectives, the operation on the night of 17/18 July was judged to be a success:
“As a result of this reconnaissance the position and strength of the German dispositions in the neighbourhood was established and the battalion received the congratulations of the GOC 48th Division.”
But the Bucks Battalion was not finished with the Battle of the Somme, not by a long way…
Pulled back to billets at Bouzincourt, orders were received the following day for a divisional attack over the same ground, which would take place on 21 July. Having found out the location and strength of the enemy, the 48th Division was now going to have to try to push them out as part of a general advance towards Pozieres.
Bucks Battalion At Battle of Asiago
15/16 June, 1918: The 1/1st Bucks Battalion helped to stop the last great Austro-Hungarian attack of WW1 on the Asiago Plateau in Italy.
With their Spring offensive of 1918 on the western front failing to achieve the hoped-for break-through, and Allied defences growing stronger by the day, the German high command exerted pressure on its Austrian ally to attack on the Italian front in a bid to weaken the British and French defences in France and Belgium.
This manifested itself in a significant Austrian offensive in the lower Dolomites between the Asiago Plateau, above the Venetian Plain and the Piave River, which flows into the Mediterranean Sea near Venice. It was believed that a break-through in the mountains would threaten the Piave line from the rear and force the Italian army to withdraw or be cut off. The Italian, British and French armies had been planning their own attack in the area but the Austrians beat them to the punch.
The attack was launched behind a heavy artillery bombardment that commenced in the early hours of 15 June, much of the weight falling on units of the 48th (South Midland) Division, who were holding part of the line on the Asiago Plateau. The defences in this sector were particularly shallow, with only a few miles between the front line and the edge of the mountains. In order to provide some ‘depth’ the British had pushed out a line of outposts into no-man’s land while the main line of resistance ran in twists and turns through a densely-wooded area behind the Ghelpac Stream. In this area the tree cover favoured the attacker, allowing them to advance unobserved until almost at the British front-line trench. Although the Asiago Plateau had been a battlefield for some time, the tree cover remained largely intact in June, 1918.
General Officer Commanding 48 Division, Maj Gen Sir Robert Fanshawe, was an enthusiast for the German concept of ‘elastic’ defence. This involved holding the front line lightly and allowing the enemy to exhaust men and material in the break-in battle before counter-attacking from depth to drive them out again.
At Asiago, with very little space to trade, Fanshawe organised his defences to channel the enemy into a salient in which they could be attacked from three sides. This was achieved by creating two switch lines – Lemerle to the east and Cesuna to the west – running back from the front-line trench to form a pocket. His plan was to allow the Austrians to advance into the pocket, even though that meant temporarily losing the front-line trench, and then, when they were weakened from their assault, launch a massive counter-blow to eject them and, hopefully, pursue them across no-mans-land and beyond. Fanshawe ensured that his brigades were familiar with his defensive plan and the battalions had practiced their parts in it in the days running up to the offensive.
The 48 Division front was held by two Brigades – 145 on the right and 143 on the left. The former had two battalions in the line – 1/4th Oxfordshire and Buckinghamshire Light Infantry and 1/5th Gloucesters while the latter held its portion of the front with a single battalion, 1/5th Royal Warwickshires. The other units were in reserve at various locations in the vicinity while 144 Brigade was a bit further away.
Following the opening bombardment, but before the enemy infantry assault, 145 Brigade, under the temporary command of the Lt Col L L C Reynolds of the Bucks Battalion, moved 1/1st Bucks into the Lemerle Switch and Polderhoek Trench and 143 Brigade ordered 1/8th Royal Warwickshires into the Cesuna Switch These movements were in line with Fanshawe’s defensive plan.
It should be noted that at this time the Division was at about 70% of its established combat strength due to Spanish Influenza, sometimes known to the troops in Italy as ‘Mountain Fever’. For a few days prior to the attack, only Fanshawe and his Intelligence Officer were fit for duty at Divisional HQ and the Corps Commander, Lord Cavan, had to send some of his own staff forward to plug the gaps. One battalion – 1/6th Royal Warwickshires – was down to 379 effectives and during the month of June 1/1st Bucks had reported 103 ‘flu cases.
The outpost line was pulled in at about 0530, two hours after the opening artillery bombardment, and the enemy infantry assault commenced at around 0700, making good use of the thick tree cover and a dense morning mist to quickly break-in at a number of locations. The 1/4th Oxfords were pushed back slightly, but held on to a piece of high ground known as Hill 1021 while the 1/1st Bucks Battalion in the Lemerle Switch managed to ensure the right flank remained intact. Dangerous gaps opened between the Oxfords and the 1/5th Gloucesters, and between the Gloucesters and 1/5th Royal Warwickshires, and through these the attacking infantry advanced.
However, Fanshawe’s defensive plan worked broadly as planned. The Austrian infantry exhausted themselves in the break-in battle, failing to achieve the desired break-through, thanks in no small measure to the steadfastness of the 1/1st Bucks and the 1/8th Royal Warwickshires in the switch lines. An initial counter-attack that evening re-gained some ground before getting bogged down. A more deliberate advance, early the following morning using additional reserves, successfully drove the enemy back, regained the front-line trench, and launched a pursuit over the Ghelpac Stream and into the Austrian lines before pulling back again.
48 Division’s casualties in the battle were relatively light by western front standards. A total of 16 officers and 153 other ranks were killed with 44 officers and 490 other ranks wounded. Nine officers and 21 ORs were listed as missing. Of the total casualties at least 196 were gunners, many of whom died in the opening bombardment, during which the enemy artillery targeted British gun positions with HE and gas shells. 1/4th Oxfords and 1/5th Gloucesters, who bore the brunt of the infantry attack, suffered the largest number of fatalities, 42 and 36 respectively. 1/1st Bucks recorded eight dead and 42 wounded. Many of those who fell on this day now lie in Commonwealth War Grave cemeteries in the woods at Boscon, Grenezza and Magnaboschi.
The 1/1st Bucks Battalion’s 8 dead from the 15 June fighting all lie in Boscon British Cemetery, in the woods just yards from where they fell. They are:
L/Cpl George Abbott (23), son of Arthur and Lavinia Abbott of Hanslope, Bucks. |
Pte Albert Allen, husband of Nellie Allen, 8 Mill Street, High Wycombe, Bucks. |
Pte William Thomas Godfrey (24), son of Frank and Sarah Godfrey, 6 Magdalen Road, Oxford. |
Pte Percy Edmund Harrison (26), son of John and Christian Harrison, Douglas, Isle of Man. |
Pte Sydney George Miles (41), son of Annie and William Miles, Venn St, Amersham, Bucks. |
Pte H E Boyle (no further details reorded). |
Pte Lesley Vincent Greenough (21), son of Arthur and Sarah Greenough, Hammersmith, London. |
Pte George Henry Norcott (23), son of George and Annie Norcott, Hammersmith, London. |
|
Another victim of the attack was the 48th Division’s GOC, Maj Gen Sir Robert Fanshawe. Despite having planned an elastic defence which worked pretty much as he had intended, Fanshawe was dismissed a few days later and sent back to the UK to command a home-based division for the remainder of the war. The penetration of a thinly-held front line, although part of his intended scheme of manoeuvre, apparently proved unacceptable to his boss, Lord Cavan.
Bucks Battalion CO Wins George Medal
8 June, 1944: Two days after splashing ashore on D-Day, Lieutenant Colonel Ronald Sale, Commanding Officer of 1st Bucks Battalion, won the George Medal for pulling ammunition from a burning dump on SWORD Beach, Normandy.
The ammunition had been set alight by a lone German aircraft that dropped a single bomb on a DUKW amphibious vehicle, the explosion of which ignited the dump. About half the dump was saved and Sale received the George Medal for gallantry.
The Bucks Battalion’s role as part of No 6 Beach Group for the D-Day landings had ceased by 22 June and the unit moved inland to defend the Ouistreham locks on the Caen canal. The Beach Group was formally dissolved on 10 July 1944.
Lt Col Sale was succeeded by Major E. A. ‘Peter’ Carse, pre-war commander of the battalion’s Chesham Detachment, who had won the MBE for his efforts during the same incident.
The George Medal was instituted on 24 September, 1940, by King George VI as a second-level civilian decoration, intended to be presented to those performing acts of bravery meriting recognition by the United Kingdom.
The George Medal is the second highest gallantry medal that a civilian can be awarded, next to the George Cross. Military personnel are eligible for the George Medal if their act does not qualify for a military gallantry award – eg an act that was not ‘in the face of the enemy’.
The medal warrant states:
The Medal is intended primarily for civilians and award in our military services is to be confined to actions for which purely military honours are not normally granted.
Bucks Battalion Lands on D-Day
6 June, 1944: The First Buckinghamshire Battalion landed on SWORD Beach on D-Day as part of No 6 Beach Group.
The survivors of the Defence of Hazebrouck in May 1940 who managed to make it to the Dunkirk beaches and back to England, formed the nucleus of a regenerated battalion which, in March 1943, was selected to take part in Operation OVERLORD, the allied invasion of Europe.
The battalion, commanded by Lt Col Ronald Sale, was tasked to be the infantry component of No 6 Beach Group, supporting 3rd Division’s landing on SWORD beach near Ouistreham on the Normandy coast at the mouth of the River Orne and to the north of the city of Caen.
Beach Groups were key elements of the OVERLORD plan. They were tri-Service, all-arms groupings of infantry, engineers, transport, medical RASC, RAMC, pioneers, military police, RAF and RN personnel, whose job was to facilitate the landing of men, vehicles and supplies across the assault beaches. Tasks included mine and obstacle clearance as well as organising the defence of the beaches against enemy counter-attack.
Training for D-Day took place at Gailes Camp near Troon in Scotland and then Ayr Racecourse and on the Clyde and Argyllshire sea lochs, with a series of exercises on beaches in South Wales and in Hampshire. After a return to Ayr in September 1943 for further exercises, the battalion moved to Petworth in May 1944 ahead of the invasion.
No 6 Beach Group landed behind No 5 Group, which had hit the beach with the first wave, losing its commanding officer, Lt Col D H V Board to a sniper in the process. Lt Col Sale assumed command of both groups for the duration of the landings.
Landing with the Bucks Battalion that day was 18-years-old Bill Adams. Recalling the moment they learned they were to be part of a beach group, he explained:
“This was greeted with mixed emotions as we had envisaged ourselves splashing through the surf, wielding bloodied bayonets. Our battalion had been the rearguard in 1940, holding up the Germans at Hazebrouck…there was definitely a feeling of retribution in the air…”
Bucks Gunners Arrive in India
3 June, 1942. 99th (Royal Bucks Yeomanry) Field Regiment, Royal Artillery (TA) arrived at Bombay (now Mumbai), India.
Following the Dunkirk campaign, the 99th had served as a coastal defence regiment in Yorkshire before moving to Tewkesbury, Gloucestershire in December, 1941. They took part in exercises in Wiltshire in February, 1942 before leaving the UK for India in April of that year, as part of 2nd Division. This followed the loss of Burma to Japanese forces, who captured Rangoon in March, 1942 and then advanced to the border with India, British, Imperial and Chinese troops withdrawing in their path.
99 Regiment’s vehicles and guns were moved to Birkenhead on 29 March and loaded on SS Clan Lamont. The officers and men then went by rail to be embarked on HMT Empress of Canada at Glasgow on 12 April. This became part of the huge convoy W.S.18, with 43,000 troops on 21 transport ships and 12 escort vessels.
By way of Freetown in Sierra Leone and Cape Town, South Africa, the convoy reached Bombay on 3 June 1942. Training on board had taken place from 0930-1230 and from 1430-1700 daily. All troops wore boots up to midday and anti-mosquito precautions were enforced after sunset. Shore leave was allowed in Cape Town with a number of route marches also taking place during the three days spent there. Following shore leave in Bombay, the 99th entrained for Ahmednagar on 4 June.
First Bucks Battalion – Battle of Hazebrouck May, 1940
Following the German invasion of France and the Low Countries on 10 May, 1940, the First Bucks Battalion advanced into Belgium towards the Dyle Line, to the east of Brussels, and then began a slow withdrawal back into France. By the morning of 25 May the battalion has arrived at the French town of Hazebrouck and started to improve the local defences.
They didn’t know it at the time, but they were about to play a key role in the Defence of Dunkirk, helping to delay the advancing German army and buy time for the British Expeditionary Force to be evacuated from the channel beaches. You can view the battalion’s dispositions at the start of the battle here.
28 May – the heroic defence ends.
The night of 27/28 was eerily quiet, both sides no doubt licking their wounds from the day’s fighting. At stand-to, as dawn broke over the town, enemy mortars began to range in on the orphanage and it was not long before an ammunition lorry was hit, adding to the general din.
At 0900 an enemy artillery battery appeared less than half-a-mile away, firing at Cassel from an open field. It was engaged by two Vickers guns from the roof of the orphanage, making life uncomfortable for the German gunners. However, the enemy returned fire with interest, using six-barrelled nebelwerfers.
At 1300 a number of tanks trundled along Rue de la Sous-Prefecture, firing at the orphanage at point-blank range. There was little the defenders could do to stop them but they returned fire anyway with rifles, Bren guns and anti-tank rifles. RSM Albert Hawtin is reported in one account to have knocked out a tank by dropping a grenade into its open turret from an upstairs window. Despite individual acts of bravery, the end of the battle was in sight and that must have been obvious to both sides. But the defenders continued their dogged defence into the afternoon before final disaster struck. According to the Regimental War Chronicles, at about 1630 Maj Heyworth was attempting to cross the street to the former GHQ building when he was hit by a sniper’s bullet and killed. Command then fell on the shoulders of Maj Elliot Viney, who decided to evacuate the orphanage and take up positions in the small, walled garden outside. Adjutant, Capt James Ritchie, died at around this time, attempting to leave by another exit.
Viney’s plan was to hold out until dark and then try to get his men away. However, this was not to be. They were spotted by a German patrol and Viney took the understandable decision to surrender. The defence of Hazebrouck was at an end.
Hazebrouck – The Aftermath
According to the Regimental War Chronicle, 10 officers and about 200 other ranks, mostly from the rifle companies, managed to find their way to Dunkirk and from there back to England. The others were either dead or prisoners of war, marching into captivity for the duration of the conflict. Among those taken prisoner was stand-in Commanding Officer, Maj Elliot Viney, who would be awarded the DSO for his leadership during the battle.
The Commonwealth War Graves Commission database shows that between 27 and 28 May, 1940, 37 Bucks Battalion deaths were recorded. These include 21 buried in Hazebrouck Communal Cemetery, including Maj Heyworth, Capt James Ritchie and 2Lt Martin Preston. One is buried at Le Grand Hasard Military Cemetery near Morbecque, one at Nieppe-Bois British Cemetery at Vieux-Berquin, about 3 miles south east of the town, and two at Borre British Cemetery, just to the east. This is a WW1 cemetery which contains just 5 WW2 burials. Finally, 14 names of Bucks Battalion men are inscribed on the Dunkirk Memorial, which records 4500 casualties from the 1939-40 campaign who have no known grave.
Perhaps the greatest tribute to the bravery, steadfastness and pure determination of the Bucks Battalion was paid by their German foes. A German radio broadcast at the time stated: “…the defenders of Hazebrouck not only delayed the advance but resisted in a manner truly worthy of the highest traditions of the British Army.”
145 Brigade Commander, Brigadier Nigel Somerset was angry about the way he and his men had been left to bear the brunt of the German attack. He hung on at Cassel until 29 May before breaking out, and was taken prisoner trying to make his way to Dunkirk. Writing in his POW Diary he stated:
“I realised we were the Joe Soaps of Dunkirk, that we were being sacrificed so that as many British and French as possible could get away and get all the kudos. I felt very bitter.’
But that understandable bitterness should not over-shadow the undoubted gallantry of the Bucks Battalion’s stand at Hazebrouck – gallantry that did not end there. Quartermaster, Capt Cecil ‘Patsy” Pallett, who together with 2Lt Michael Sherwell, a platoon commander with A Coy, managed to slip away from Hazebrouck at some point during the 28th, after C Coy was overrun. They made their way south to La Motte au Bois where they joined a part of Royal West Kents who were holding out there. Pallett went on to lead a bayonet charge to drive a party of SS infantry out of the village, buying time for his small band to pull out and head for Dunkirk from where they were able to make it back to England. He was awarded the Military Cross (MC) for this action. Sherwell also received the MC for his part in the defence of Hazebrouck.
27 May, 1940 – the enemy attacks…
The battle for Hazebrouck opened on the damp and misty morning of 27 May. Initially the enemy attacked to the south-west of the town, with tanks of 8 Pz Division over-running D Coy, 2 Royal Sussex in the Bois des Huit Rues. Shortly after this, OC D Coy, Capt Hugh Saunders, spotted an enemy vehicle near the level crossing on the western edge of his sector and tried to engage it by calling in fire from a nearby 25-pounder of 392 Battery, Royal Artillery. This was probably the enemy’s recce element, and Saunders was a little angry that the gunners missed the target. However, the gun position had been noted and, as Saunders later wrote:
“We had not been back in our Company HQ for more than a quarter of an hour before three light tanks appeared and swooped down on the 25-pounder, smashing the gun and wounding all its crew save one.”
The gun crew retreated through one of 17 Platoon’s posts, pursued by two tanks which fired into the weapon pits before making off. There were no casualties among 17 Platoon but the episode provided a taste of what was to come.
At about 1000, Saunders heard from 2Lt Tom Garside, commanding 18 Platoon, that a large force of enemy armoured vehicles was approaching from the direction of St Omer. As they waited for the next development, the battalion water truck arrived to replenish their water supply. This was the signal for the enemy to attack and just as the truck stopped by the Coy HQ building, an enemy tank approached from Le Cinq Rues and put a round straight through the side of the bowser. The German vehicles were heavily engaged by 17 Platoon’s anti-tank rifles and withdrew when one of them was hit.
1100hrs.
By late morning all three of the battalion’s rifle companies had been engaged by enemy armour as tanks probed the defences and German artillery and mortars pounded their positions. The tower of the town’s St Eloi church was the obvious place for an Observation Post: the enemy knew it and made it pretty hot for the occupant, Lt John Palmer, 98 Fd Regt, RA Forward Observation Officer (FOO) who was forced to evacuate for a time. He returned later, however, and continued to direct artillery fire on enemy positions until the telephone line between him and the guns at Le Souverain, to the south-east, was cut.
Meanwhile, D Company continued to attract enemy attention. A strong force of enemy infantry was spotted moving up along the road from St Omer and was engaged by 17 Platoon and the battalion’s single 3” mortar, sending them running for cover. But within minutes the enemy had re-organised themselves and were pouring machine gun fire onto the 17 Platoon position, making it impossible for the defenders to raise their heads.
The main attack seemed to be developing in the C Coy sector, and while D Coy were being pinned down, Capt Rupert Barry and his platoons were using their Boys rifles to fight off an assault by 5 enemy tanks. Barry was the only regular officer in the battalion, having been transferred in from 2 Oxfordshire and Buckinghamshire Light Infantry the previous month.
Afternoon.
The Bucks Battalion soldiers fought on in the face of the heavy enemy onslaught, their effective anti-tank screen of 25-pounder, 2-pounder, and 25mm Hotchkiss guns and the infantry’s .55in Boys anti-tank rifles, accounting for many panzers. Eventually, however, the attackers’ superior mass made the difference and enemy troops and armour managed to break through and over-run 14 Platoon and surround and cut off another, possibly 13 Platoon. With C Coy in deep trouble, Heyworth ordered A Coy to establish a new defensive line in the buildings behind C’s position to support Barry and his men’s withdrawal. The QM, Capt Cecil ‘Patsy’ Pallet, a WW1 veteran, and Transport Officer, Capt Bligh Mason, gathered up their B Echelon drivers to provide additional support for the withdrawal but the Germans had managed to get between C and their support and they were effectively cut off.
Meanwhile, to the east, B Coy was engaging enemy infantry advancing down the railway line. Beating off the initial assault, the company held their ground in the face of enemy machine gun fire and sniping which appeared to come from buildings to the north of the railway. Lt Clive Foster of 11 Platoon took some men to help to recover an anti-tank gun that was stuck on the enemy side of the railway line. They managed to hitch it to a 15cwt truck and pull it across 6 tracks to relative safety in the face of heavy enemy fire. However, on returning to the company position Foster found that they had pulled out and a large force of enemy infantry was approaching.
1900hrs.
B Company commander, Capt Saunders, could see large numbers of enemy forces pouring into the town and there was little he could do to stop them.
“By 7pm the enemy were well inside the town and we could hear firing in the streets. In several places fires had broken out from incendiary shells and clouds of smoke filled the air, but Battalion HQ was still intact.”
Saunders decided to try to make contact with Heyworth at HQ and Pte Page volunteered to go. However, the fire was so intense that movement in the streets was impossible and after several attempts it was decided to wait for darkness and try again.
Meanwhile, at the HQ building, 27-years-old MO, Capt Trevor Gibbens was struggling to treat the large number of wounded arriving at his Regimental Aid Post (RAP) in the cellar. He recorded:
“There was clearly not going to be much opportunity to get the wounded away for some days…I did the rounds in quiet moments, gave plenty of morphia and sips of water…”
A radio message was sent to Brigade HQ, using Morse as speech was no longer possible, explained the situation and asked for help. The reply was that help was coming from 44 Division in the south. It never materialised.
2000hrs.
By this time, resistance throughout the town was crumbling and enemy forces were closing in on battalion HQ from three sides. The rifle companies had been surrounded and cut off, reduced down to platoon-sized groups, stubbornly holding out where they could.
At 2030 the enemy broke through the D and C Coy positions and pushed on towards the centre of town. In the absence of any orders from HQ, Capt Saunders took it upon himself to order the survivors of D Coy to get away as best they could.
Meanwhile, the HQ garrison continued to hold out. Private Perkins, a D Coy runner who had drifted back to the orphanage recalled:
“Myself, along with other HQ personnel, took up our positions with our rifles at every available window…The building was now getting in a bad way, one part of it had already collapsed…”
By nightfall, all contact between HQ and the companies had been lost. Heyworth sent out two patrols: one to find the B Echelon transport and the other to B Coy. 2Lt Martin Preston headed for the main square to locate the transport but was killed at Place du General de Gaulle. 2Lt David Stebbings, the Intelligence Officer, finding the B Coy positions deserted, returned with the news. At that point it was clear that Battalion headquarters and HQ Company were the only elements of the battalion in a state to continue the fight.
Winslow Rifle Volunteers Formed
17 May, 1861: The Secretary of State for War officially accepted the 7th Bucks (Winslow) Rifle Volunteer Corps. It had originally been formed as a subdivision of the 3rd (Buckingham) RVC on 17 December 1860. It was then absorbed by the Buckingham corps to form the 3rd Bucks (Buckingham and Winslow) RVC in 1863.
Fears of invasion by France were never far from the minds of successive British governments throughout the late 18th and 19th centuries. During the French Revolutionary Wars (1792-1802), a large number of volunteer corps were formed throughout the country only to be stood down when the conflict came to an end.
However, although Britain and France had formed a military alliance against the Russians during the Crimean War ((1853-1856), by 1858 tensions between the two had increased as a consequence of the Orsini Affair, an attempt by Italian nationalists, backed by English radicals, to assassinate Napoleon III in Paris.
Faced with a renewed threat of a French invasion, and with large elements of the regular army already committed to colonial duties overseas, the Government of the day, encouraged by a particularly noisy media campaign, led by The Times, decided in 1859 to re-create the Volunteer Corps movement. The men of Buckinghamshire were not slow in coming forward. Thomas Fremantle of Swanbourne House, later 2nd Lord Cottesloe, commanded the Winslow subdivision until 1870. Fremantle’s second in command was Dr Thomas Newham, the unit’s rifles being issued from his surgery.
An early venture by the Winslow sub-division was a march out to Hogston in October 1861 for exercises that ‘evidently “astonished the natives”’ when a ‘mimic’ charge was made, and two volleys fired. In July 1865 the Winslow men marched out to Swanbourne and, after drill, visited the Red Lion Inn, the landlord, John Green, being one of the members.
Bucks Battalion ‘T’ Force Men Liberate Delft
8 May, 1945: Elements of 1/1st Bucks Battalion ‘T’ Force liberate Delft in the Netherlands.
In February, 1945, the whole of the 1/1st Bucks Battalion was designated to be part of ‘T Force’, a joint US-British Army unit created to target and secure German scientific and industrial technology before it could be destroyed by the retreating enemy or looters, or fall into the hands of the advancing Russians.
T(Target) Force units were intended to accompany each of the allied armies as they advanced eastward, and the Bucks Battalion was originally allocated to the British 2nd Army. However, as the war progressed it was decided, at short notice, to split the Bucks, with two companies – B and D – being assigned to the 2nd Army, along with 5 Kings, while A and C were allocated to the Canadian 1st Army.
T Force units were tasked with seizing and holding installations of special military and civil interest such as factories, experimental establishments, laboratories, radar stations, secret weapons testing facilities, and V-weapon launch sites. The Americans had established similar forces for the North-West Europe campaign in July 1944 but 21st Army Group did not do so until early 1945.
‘A’ and ‘C’ Companies were the first T Force personnel to enter the Netherlands on 7 May. A detachment under Captain Lowe were the very first allied troops into Rotterdam. On 8 May a group from the pioneer and signal platoons, again under Lowe, liberated the city of Delft, receiving the official welcome intended for the commander of 1st Canadian Division. With Lowe somewhat embarrassed, they managed to slip away to take the nearby radar installation that was their target. At Norden they then captured the transmitter station used to broadcast the German propagandist, William Joyce, perhaps better known as Lord Haw-Haw, to the UK. Joyce himself was captured by the British near Flensburg close to the German-Danish border, on 29 May, 1945. Convicted of high treason he was hanged at Wandsworth Prison in London on 3 January, 1946.
Bucks Yeomen Return from WW1
5 May 1919:The remaining men of the 101st (Bucks and Berks) Battalion, the Machine Gun Corps, finally returned to England at the end of World War 1.
The German Spring Offensive in 1918 and the heavy casualties sustained by the Allies as they fought to stem the enemy advance, forced a reallocation of British military resources.
As part of this shift, General Sir Edmund Allenby’s campaign against the Ottoman Turks, in Egypt and Palestine, which had seen some spectacular successes during 1917 at Gaza, Beersheba, El Mughar and the capture of Jerusalem, was deliberately stalled in order to release troops for the Western Front.
The 1/1st Royal Bucks Hussars (Bucks Yeomanry), who had seen heavy fighting at Gallipoli in 1915, operating as infantry, and later, back in the cavalry role in Egypt and Palestine, together with 1/1st Berkshire Yeomanry, were among Allenby’s Egyptian Expeditionary Force (EEF) units directed to reinforce the BEF.
But with the latter’s critical requirement being for infantry rather than cavalry, the Bucks and Berks Yeomen were ordered to swap their horses for Vickers machine guns as they were amalgamated and re-rolled as the 101st Battalion of the Machine Gun Corps.
Their beloved horses were handed in on 4 April 1918 and the new battalion embarked for France onboard the troopship SS Leasowe Castle, departing Alexandria for Marseilles on 26 May. The ship was torpedoed about 100 miles north-west of Alexandria, sinking in 90 minutes with the loss of 101 lives including 13 officers and 79 other ranks on the military passenger list.
The survivors were returned to Egypt where they transferred to another ship and finally reached France on 21 June. They would serve with distinction on the Western Front until the armistice when they found themselves at Oudenarde in Belgium, the scene of one of the Duke of Marlborough’s famous victories in 1709.
With hostilities over, the army quickly set about demobilising and units were reduced down to small cadres of personnel. In the case of 101st (Bucks and Berks) battalion, the cadre consisted of 133 men who returned to Dover on 5 May, 1919.
When battle honours were officially awarded by the War Office in 1924 those attributed to the Royal Bucks Hussars included Suvla, Scimitar Hill, Gallipoli 1915, Egypt 1915-17, Gaza, El Mughar, Nebi Samwil, and Palestine 1917-18, but also Arras 1918, Scarpe 1918, Courtrai, and Ypres 1918 – the names charting a course of distinguished service in two key theatres of the global conflict.
Militia Commander Sacked!
4 May 1763: The notorious John Wilkes, MP for Aylesbury, was dismissed from command of the Bucks Militia for criticising the King in a magazine article.
A ‘colourful’ and controversial character, Wilkes was one of the 10 company commanders of the ‘new militia’ raised in Bucks in 1759. He rose to the rank of Lt Col in 1762, assuming command in succession to Sir Francis Dashwood of West Wycombe, who resigned from the role on his appointment as Chancellor of the Exchequer.
A radical in political outlook, Wilkes had, nonetheless, proved a conscientious militia officer, although Edward Gibbon, the famous historian of ancient Rome and an officer of the South Hampshire Militia, on meeting him during a regimental camp at Winchester, described him as ‘a thorough profligate in principle as in practise; his character is infamous, his life stained with every vice, and his conversation bawdy’.
Gibbon’s unflattering depiction has a ring of authenticity, particularly given Wilkes’ membership of Dashwood’s Medmenham Brotherhood, sometimes referred to as the Order of Knights of West Wycombe or perhaps best known as the Hell Fire Club.
However, his removal from command of the militia came not as a result of his nocturnal activities at West Wycombe’s Hell Fire Caves, but from an article in Issue 45 of his satirical magazine The North Briton (think Private Eye), in which he attacked King George III, claiming he was complicit in deceiving the public on peace terms concluded with France.
Languishing in the Tower of London, Wilkes wrote to his friend and benefactor, Earl Temple, the Lord Lieutenant of Buckinghamshire, that he was ‘happy in these days of peace to leave so excellent a corps in that perfect harmony, which has from the beginning subsisted’.
DORA Volunteers to Fight the French
1 May 1798: A total of 625 volunteers were enlisted for home defence at Newport Pagnell, 39 at Aylesbury, and 119 at Buckingham under powers set out in the new Defence of the Realm Act (DORA), signed into law the previous month.
With much of Britain’s standing Army fully committed on the continent and elsewhere, the Defence of the Realm Act was one of a number of wide-ranging plans drawn up by the UK government in response to fears of invasion by the French, a common condition in Britain for long periods of the 18th and 19th centuries.
The 1798 Act permitted the raising of armed associations, the government hoping to encourage participation in a home defence force from what it described as ‘respectable house-holders’. The Lord Lieutenant of Buckinghamshire, the Marquess of Buckingham, set his sights a little higher, hoping that ‘persons of a better description’ would come forward.
The law was written with a light touch. Instead of stipulating the basis on which the volunteers would serve, it allowed the new citizen soldiers to set their own rules and regulations, including limits to their obligation. So, for example, those who enrolled at and around Newport Pagnell stated that they were prepared to go only 10 miles from the town in the event of French invasion. Those enrolled at Aylesbury and Buckingham were a bit more adventurous, signing up to serve within one day’s march of the town in case of riots, but anywhere in the county if it came to repelling the French invaders. “Fighting them on the beaches” would have to be a task for others, it seems!
Oakley Man Wins Victoria Cross at St Quentin
28 April 1917: Oakley-born Company Serjeant Major (CSM) Edward Brooks of 2/4th Oxfordshire and Buckinghamshire Light Infantry, a Territorial Force battalion, wins the Victoria Cross at Fayet, near St Quentin in northern France.
In mid-March the Germans withdrew to the newly-prepared Hindenburg Line, pursued by the Allies, including 61st Division, to which 2/4th OBLI was attached as part of 184th Infantry Brigade.
After spending a week at Honlon village, 184 Brigade was warned off to conduct a raid on the German outpost line opposite Fayet, just in front of the Hindenburg Line in which 2/4th OBLI was scheduled to take part. The intent was to penetrate a portion of the enemy’s front line, kill or capture as many Germans as possible, and then retire. The plan was to pass the raiders through a gap in an unoccupied section of the German line, and conduct a sweeping movement to take the enemy from the flank and the rear.
CSM Brooks (34), was in the second wave as his battalion attacked. The VC citation, published in the London Gazette, records:
“Seeing that the first wave had been checked by an enemy machine gun at close quarters, on his own initiative and regardless of personal danger, he rushed forward from the second wave with the objective of capturing the gun. Killing one of the gunners with his revolver, and bayoneting another, the remainder of the gun’s crew made off, leaving the gun in his possession.
“CSM Brooks then turned the machine gun on the retreating enemy, after which he carried it back to our lines. By his courage and initiative, he undoubtedly prevented many casualties, and greatly added to the success of the operations.”
Edward Brooks, was born in Oakley, Bucks, the son of Mr and Mrs Thomas Brooks. Educated at the local village school, he left home at 13 to work at the Huntley and Palmer biscuit factory in Reading and later as a labourer for Messrs Knowles and Sons, a well-known building contractor in Oxford
He enlisted in the Grenadier Guards on 9 January, 1902, and was, somewhat ironically, a member of an honour guard for a visit to Britain of Kaiser Wilhelm II. He transferred to the Army Reserve in January, 1905, being discharged, at the end of his reserve liability, in January, 1914.
Brooks enlisted in 2/4th OBLI, on 19 October, 1914, not long after the outbreak of war, being promoted to L/Cpl the same day. He was promoted to Sgt in May, 1915 just before the battalion left for the front, and was promoted again to Warrant Officer and appointed Company Serjeant Major on 29 July of that year.
CSM Brooks received his VC from King George V at Buckingham Palace, after which he travelled to Oxford for a civic reception before being driven home to Headington where he received gifts paid for by public subscription from the neighbourhood. He returned to the front but was later hospitalised with rheumatism and evacuated back to the Southern General Hospital in Oxford. He was finally discharged from the army on May, 1920.
After the war he worked as a bricklayer and then at the Morris Motor Works at Cowley. He died at his home at Morrell Avenue, Oxford, in 1944, and is buried in the city’s Rose Hill cemetery. A VC plaque was unveiled at Oakley on 28 April 2017 and a blue plaque at his former home in Headington in July 2017. Edward Brooks Barracks at Abingdon was named in his honour by the Ministry of Defence in 2009. His VC is in the collection of the Royal Green Jackets (Rifles) Museum at Winchester.
Bucks Yeomen Escort King Louis XVIII from Aylesbury to Stanmore
Bucks Gunners Help To Relieve Kohima
18-20 April 1944: The 99th (Royal Bucks Yeomanry) Field Regiment, Royal Artillery, supported 6th Infantry Brigade in forcing a way into the town of Kohima to relieve the garrison under siege from the Japanese.
In March 1944 the Imperial Japanese Army launched an offensive towards India’s North-East frontier. Their aims were to forestall a planned British invasion of Burma, capture the allied supply lines on the Imphal Plain and cut the road between Dimapur and Imphal at Kohima. With Imphal in their hands the Japanese would be well-placed to disrupt air supplies to China and to conduct air attacks against targets in India.
In an attempt to achieve this, they threw 100,000 men into the fight against the Assam frontier stations of Imphal and Kohima and conducted an earlier diversionary attack in the Arakan. This latter advance was defeated at the Battle of the Admin Box but by April 1944 the allied troops at Kohima and Imphal were surrounded.
Kohima was held by a TA battalion, the 4th Royal West Kents, and elements of the Assam Rifles, the Shere Regiment and the Burma Rifles.
South East Asia Commander, Admiral Lord Louis Mountbatten, ordered the British 2nd Division including 99 (RBY) Field Regiment to move to Dimapur where it joined with 33 Corps (Lt Gen Sir Montagu Stopford) to relieve Kohima and to open the road to Imphal, which was being supplied by air.
6 Brigade broke through to Kohima between 18 and 20 April, a grim struggle ensuing for the surrounding jungle-clad hills and ridges in cold weather. At Kohima itself only the width of the former District Commissioner’s tennis court separated the British and Japanese positions. The stench of death was overwhelming with bodies from both sides lying unburied in scenes reminiscent of the worst of the trenches of the Great War. 6 Brigade undertook a major offensive on 4-7 May, the Japanese pulling back after a 64-day battle, which cost British and Indian forces over 4,000 casualties and the Japanese over 7,000.
Lieutenant Colonel J. W. H. James, who had assumed command of 99 Fd Regt on 26 March, was mortally wounded by a sniper on 4 May, Lionel Tetley taking over. Captain Richard Boyd-Thomson from Soulbury was wounded on a patrol which had to abandon him on 3 May; his dismembered body was recovered later.
With ranges from the gun lines to the enemy often down to less than 2000 yards, the artillery were, for much of the time, firing over open sights, instead of the more usual, indirect method, used when the target is not visible. Normally, a Forward Observation Officer (FOO) identifies and selects targets and directs the battery’s fire onto them while the battery’s Command Post personnel work out bearing and elevation using mathematical calculations and range tables taking account of wind direction, air pressure, precipitation, elevation of the firing position and the target, barrel-wear etc. Firing over open sights dispenses with much of the technical assistance since the gunner can see the target, align the barrel by sight, and adjust range and azimuth (direction) by observing the fall of shot. Forward Observation Officers (FOOs), operating in the front line with the infantry, found themselves involved in some of the hand-to-hand fighting for which this battle is noted.
There were many acts of bravery. One such example was Captain Bryan Bonsor of Liscombe Park, Soulbury, who won the MC for his gallantry and leadership on 13 May during an attack on the District Commissioner’s Bungalow, in which a 3.7” howitzer was brought up to fire directly at the Japanese position at a range of just 200 yards.
2nd Division opened the Imphal road on 22 June and 99 Regiment continued to support follow-on operations until withdrawn for rest and training in August 1944.
Battle of Tombois Farm – Hindenburg Line
16/17 April, 1917:The 1/1st Buckinghamshire Battalion took part on a successful night attack on Tombois Farm, a German strongpoint in front of the mighty Hindenburg Line.
In mid-March, 1917, after the pummelling they had taken during the Battles of Verdun and the Somme the previous spring, summer and autumn, the Germans conducted a deliberate withdrawal to a new, pre-prepared line, running from just North of Arras to the River Aisne, near Reims, in places more than 30km east of the original front line. This was known as the Hindenburg Line or Siegfried Stellung.
The new line had been built by Belgian and Russian labourers. It was over 8 miles deep in places with numerous ferro-concrete bunkers, deep dugouts and machine-gun emplacements, fronted by thick belts of barbed wire. In moving to the Hindenburg Line the Germans straightened the front, shortening it by 25 miles and releasing 10 divisions from ground-holding duties to prepare for future offensive operations.
Tombois Farm is located about 1000 yards east of the British outpost line at that time. It is on the southern side of the road from Lempire to Vendhuile, to the east of Epehy, and just to the right of the north-bound carriageway of the A26 (Autoroute des Anglais), which now runs from Calais to Reims but did not exist in 1917.
On the night of 15 April, the Bucks Battalion moved into the line after a short period of rest, receiving orders to attack Tombois Farm the following night. At the same time, 1/4th Berkshires were to capture Guillemont farm on the right while 1/5th Royal Warwickshires were to assault and capture Catelet Copse and Le Petit Priel Farm on the left. Zero was fixed for 2330 on 16 April.
Weather conditions for the attack were atrocious – pitch dark with pouring rain and a gale blowing towards the enemy – giving platoon commanders a major headache, first in finding their forming-up positions and then in trying to keep their men moving in the right direction across 1000 yds of open ground with few landmarks.
At 2345 the enemy opened fire with machine guns and rifles, sending up a large number of flares from the farm and the trenches to either side. They also put down a ‘moderate’ artillery barrage, fortunately well behind the attacking troops. The farm itself was strongly held, and protected by a deep belt of wire, which, combined with heavy fire, stopped C and D Coys on the right flank and they were withdrawn to reform for a second attempt.
Meanwhile, B Coy on the left, attracting less fire, managed to penetrate the wire, got into the enemy trenches and began to clear the farm buildings, although the enemy garrison was still holding the orchard to the south.
By 0300 both the farm and the orchard had been cleared and an enemy counter-attack was successfully broken up by B Coy. C and D Coys, now reorganised, were sent forward again to help with consolidating the position, including digging new trenches to the north and east of the farm.
By daylight on the 17th the battalion was holding 3-400 yards of trench on either side of the farm and the enemy had withdrawn to new positions further east. At least 30 dead Germans were found in and around the farm. Nine prisoners and one machine gun were captured. The Bucks Battalion casualties were:
Officers (Wounded): Capt Reginald George Gregson-Ellis (died the following day, buried in Peronne Communal Cemetery Extension), 2/Lt J Jack, 2/Lt N S Flint, 2/Lt B C C Olivier, 2/Lt R F Chatham.
ORs. Killed – 18. Wounded – 48.
Many of those who died in the attack have no known grave and are commemorated on the Thiepval Memorial to the Missing. These include:
265695, Cpl Albert George Wright, (27), born Newport Pagnell; 265394, Pte William Stephen Burgess (20), Buckingham Road, Aylesbury; 265170, Cpl William Lawrence Raison, (23), Stony Stratford; 265172, Sjt Ernest Adams; 266541 Pte Charles Banks; 285068, Pte Harold Cecil Avery (17), Moseley Cottages, Naphill, High Wycombe; 285004, Pte John Roberts (35), Stirchley, Birmingham; 266881, Pte Benjamin Stone (39), Portland, Dorset; 265419, L/Cpl James McDermott; 265750, Pte Michael Cecil Keating; 265212, Pte William Joseph Burnham; 267588, Pte William Albert Rogers; 267505, L/Cpl William Henry Rootham (20); 267686, Pte Walter Phillips.
The following are buried in Unicorn Commonwealth War Graves Commission Cemetery, Vandhuile, just a few yards south-west of Tombois Farm:
267715, Pte Alexander Scott (20), King’s Head Square, Aylesbury; 267498, Pte Ernest Edward Rose,(18), Huntingdon; 266860, Pte A G Rice (37), Weymouth, Dorset; 267715, Pte A Scott.
Miners’ Strike 1921 – Bucks Territorials Enrol For Defence Force To Guard Key Installations
13 April, 1921: Buckinghamshire Territorials were being enrolled to provide a Defence Force for key installations as part of the Government’s response to the miners’ strike.
The pre-1914 Territorial Force had not been given a role in providing aid to the civil power and, after consideration upon post-war reconstitution, it was decided again in 1920 that the Territorial Army (TA) would not be so used.
However, in 1921, with a miners’ strike and lock out raising fears of more general industrial unrest, the Government began to take steps to improve its ability to manage the likely impact of a coordinated national stoppage.
On 8 April Army Reservists were called out and, in the face of continuing War Office opposition to the use of Territorials, it was announced that an armed Defence Force would be raised for 90 days’ service in support of the police but under Army command. Territorials were invited to enlist and the force would be based in TA centres and organised by TA staff and officers. However, to appease the War Office concerns, it was decided that Territorials who wished to volunteer for the new force, would have to resign from the TA, on the understanding that they would be reinstated automatically after 90 days and any time spent on duty with the force would count towards their TA obligations. Nationwide at least 40,000 men enrolled by 13 April and possibly twice as many by the time the Defence Force was stood down on 5 July, 1921.
The announcement of the raising of a Bucks Battalion of the Defence Force was made on 12 April and subsequently a force of 259 men guarded the important railway junction at Didcot from 13 April to 5 July 1921, under the command of Lieutenant Colonel Lewis Reynolds, wartime commander of the 1/1st Bucks Battalion. Defence Force personnel left Aylesbury for Didcot in scenes reminiscent of 1914. It proved a ‘long hot summer under canvas’: the chief object of officers’ attention was the regular disappearance of the mess sergeant to Epsom, Newbury and Ascot races.
In 1923, the military authorities supported legislation – The Special Constables Act (1923) – making permanent the 1914 arrangements whereby special constables could be sworn in during ‘any immediately apprehended disturbance’. Consequently, in the May 1926 general strike a total of 226,000 special constables and a 300,000 strong Civil Constabulary Reserve were raised under control of the Home Office.
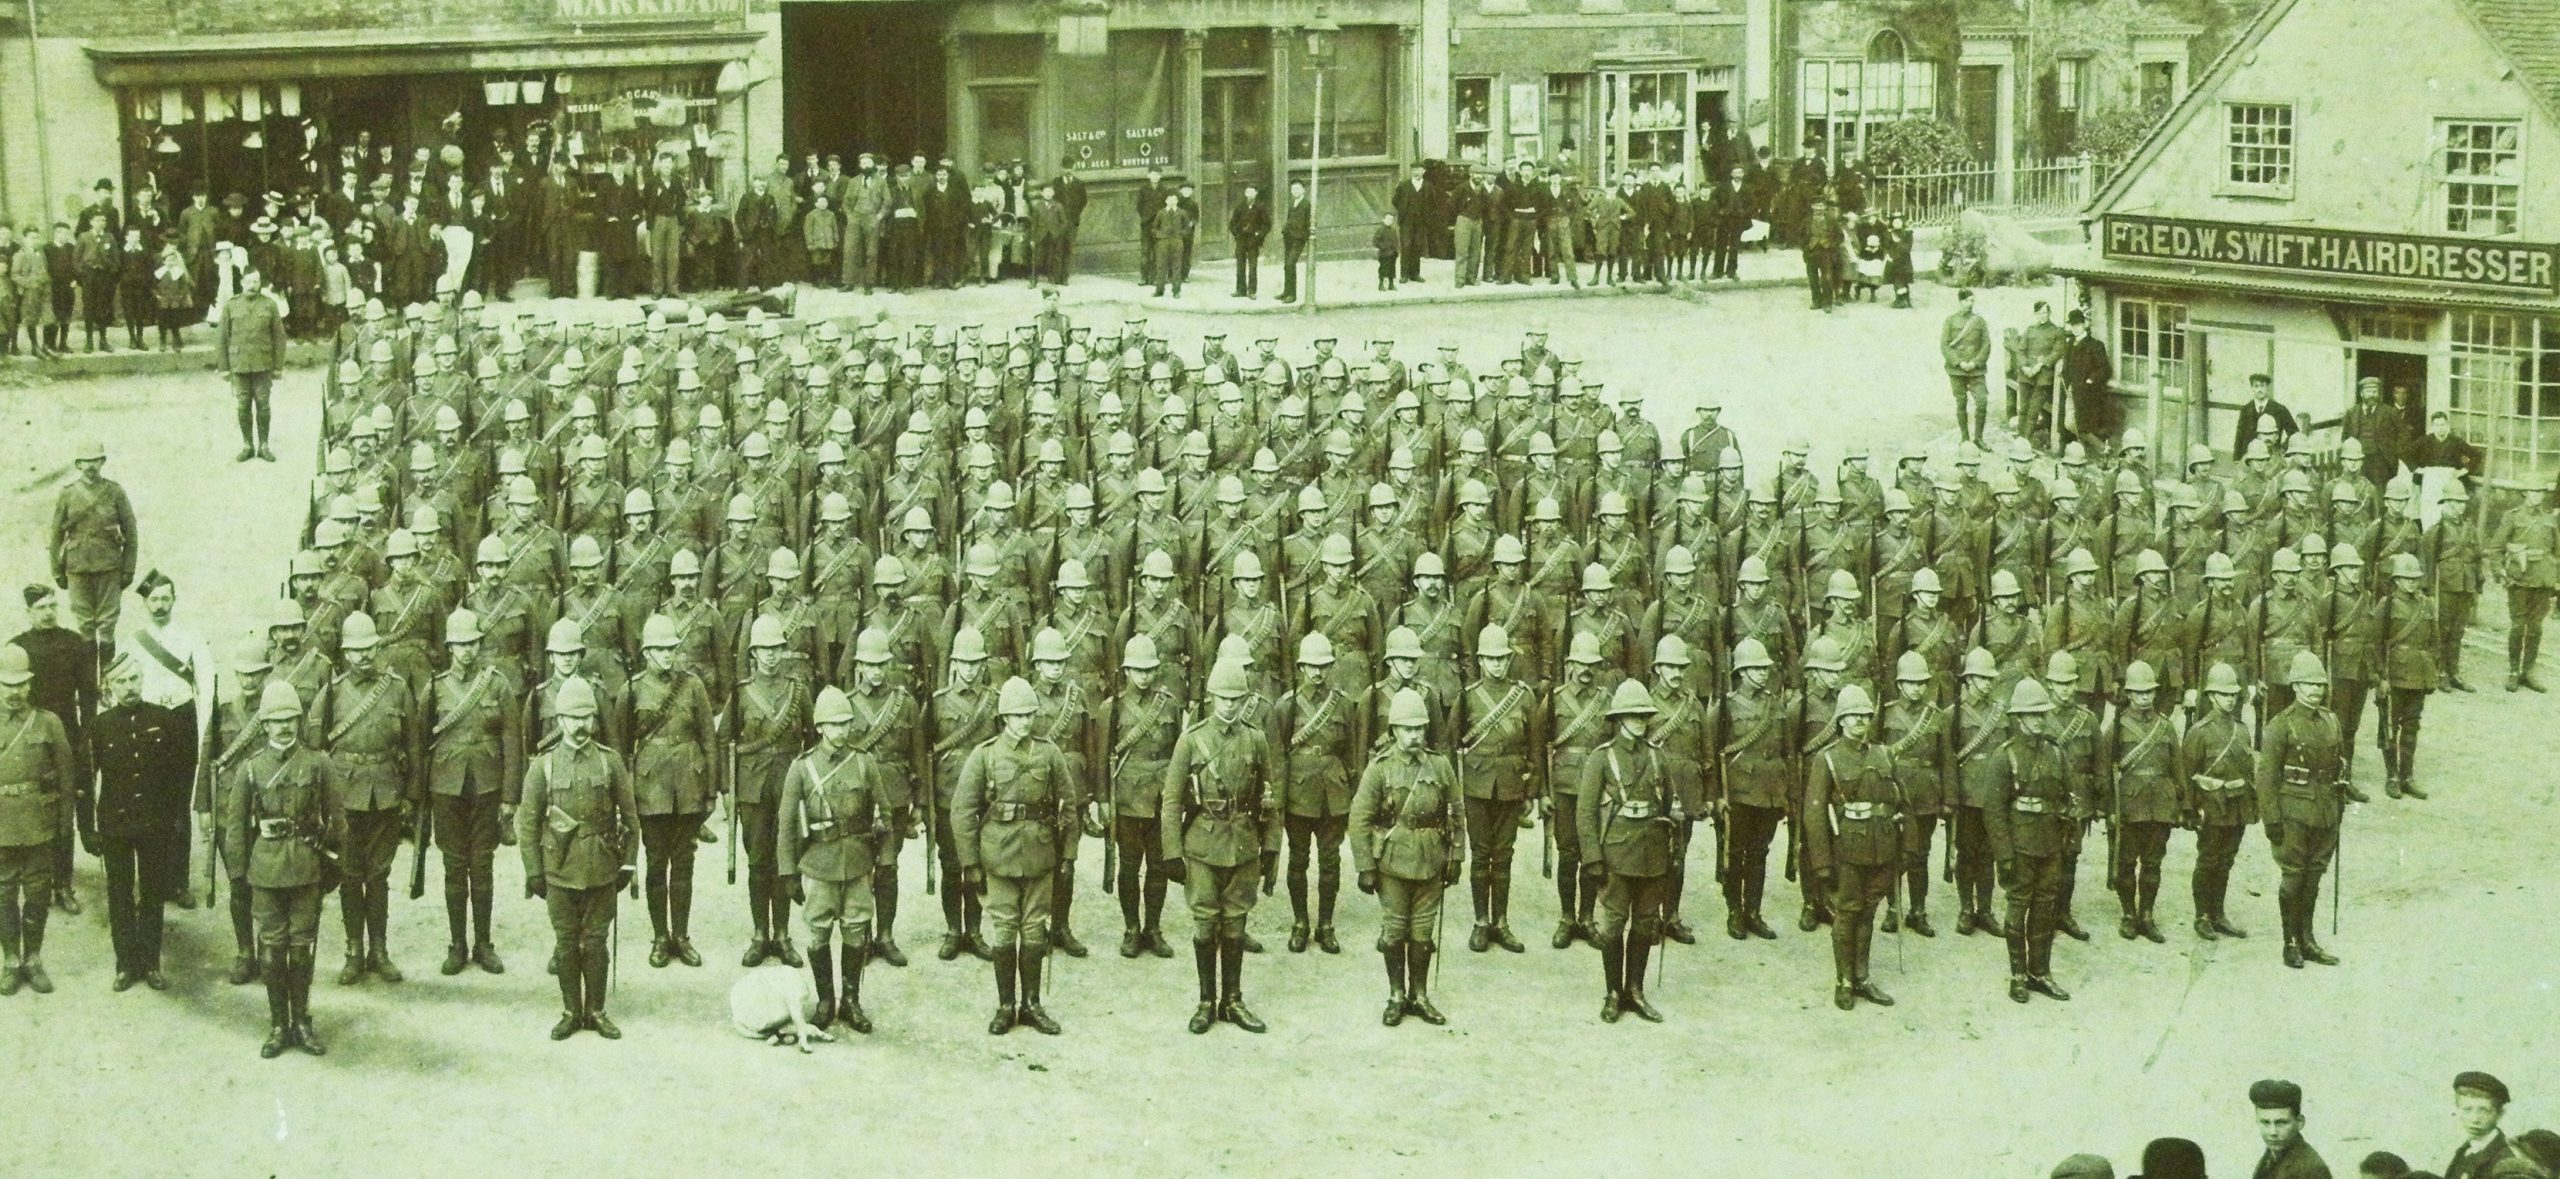
37th (Royal Bucks Hussars) Company, 10th Battalion, Imperial Yeomanry, parade in Buckingham in 1899 before leaving for South Africa.
Bucks Yeomen In Action at Boshof, South Africa
5 April, 1900: The 37th and 38th (Royal Bucks Hussars) Companies of the 10th Battalion, Imperial Yeomanry (IY) are the first to go into action against the Boers at Boshof in South Africa.
The 10th and 15th Battalions IY were among four attached to Lord Methuen’s 1st Division at Kimberley. Methuen was more prepared than some regulars to see the auxiliaries in action and, acting on the left flank of the British advance towards Bloemfontein, ordered the battalion to attack a small Boer commando that had stood to fight at Boshof, 33 miles north-east of Kimberley.
This Boer action was unusual because the commando was largely composed of foreign volunteers with the Boers under the command of the former French colonel, Comte de Villebois-Mareuil, who had been tasked with blowing up the railway bridge over the Modder River to cut the supply line to Kimberley.
The 25 or so Boers holding one kopje (Africaans for small hill) retreated at once but the 100 or so foreigners – French, Belgian, Dutch German, Italian and Russian – under Villebois-Mareuil – remained on an adjacent kopje. After some four hours, with Villebois-Mareuil dead, his force surrendered. The commando had suffered 10 dead and 11 wounded with a further 51 captured. According to a member of Methuen’s staff, many of the prisoners ‘had the most immoral and disgusting photographs in their inside pockets’. The Imperial Yeomanry had three dead and eight wounded.
Some of the men advanced dismounted once they came under fire, requiring an advance of about 1,000 yards in the open. Others rode around the Boer flank and then dismounted. Quartermaster Sergeant W. J. Gough of Buckingham with 37th Company recorded:
“My first impression of being under fire was that you don’t realise they are shooting at you until you see someone roll over alongside you.” Buckingham Express, 5 May 1900.
That night, all were soaked by rain amid a thunderstorm. The 34 year old Sergeant Patrick Campbell of the 37th Company – estranged husband of the actress Mrs Patrick Campbell – was one of the three IY killed. The other two dead were Captain Cecil Boyle from the 40th Company, and Lieutenant Arthur Williams from 10th (Sherwood Rangers) Company of the 3rd Battalion, who was killed when some Boers raised a white flag, and others kept firing. The prisoners included an alleged Russian Prince, Bagratian of Tiflis, was actually believed to be a Polish Jew from Hornditch.
Campbell, shot through the head, and the others including Villebois-Mareuil were buried at Boshof, Methuen having a headstone erected to the Frenchman. Lord Chesham, who commanded the 10th battalion, brought the Frenchman’s horse back to England. In a rather quixotic gesture, its heart and ceremonial trappings were buried on the village green at Latimer in 1911 next to the war memorial to the men from the village who served in South Africa. Villebois-Mareuil’s body was moved from Boshof to Magersfontein in 1969. The graves of Campbell, Boyle and Williams remain at Boshof cemetery, as do the graves of those killed fighting for the Boers. A memorial stone on one of kopjes held by the Boers was unveiled in 1987.
This website of The Buckinghamshire Military Museum Trust ('BMMT') is copyright of BMMT. If any items on the site are republished or copied for research private study or for use within educational establishments the source and copyright status must be acknowledged and any reference quoted. Commercial users wishing to reproduce any item must seek prior written permission from the Trustees.
BMMT has taken all reasonable steps to ascertain any known copyrights. Any infringement is inadvertent and will be rectified on notification.

Registered with the Charity
Commission No: 1189645
Registered Museum No: 1550
Thank you to our sponsors:
